
Care and Maintenance
Rope Access Window Cleaning: Property Manager's Guide
Discover rope access window cleaning: benefits, safety, and costs for property managers in Phoenix, Denver & Las Vegas. Make informed decisions.


You pull the boat out, take one look at the hull, and realize a hose and deck brush aren't going to cut it. The waterline is dark, the transom has that stubborn film, and the bottom is carrying enough growth to remind you how quickly neglect shows up on the water.
A boat power washer solves that problem fast, but only if you use it with restraint. Too little machine and you waste an afternoon. Too much pressure or the wrong nozzle and you can scar gelcoat, lift decals, force water into fittings, or create runoff problems that a marina manager will notice immediately.
The good news is that safe, effective washing is very doable. The key is knowing where pressure helps, where chemistry helps more, and where you should stop before cleaning turns into repair work.
The hull tells the truth about how a boat has been maintained. When algae, slime, and scum start building at the waterline, the issue isn't just appearance. Dirt hides stains, traps residue around fittings, and makes it harder to inspect the finish for chips, blisters, and wear.
A good boat power washer cuts through the part of the job that usually wears people out. Instead of grinding through long stretches of hand scrubbing, you can remove loose growth, grime, and residue in controlled passes. That's one reason pressure washing has become such a standard part of marine maintenance. The global high-pressure washer market was valued at $5.1 billion in 2022 and is projected to reach nearly $6.97 billion by 2028, with pressure washing noted as a preferred maintenance method that can reduce cleaning time by up to 70% compared with manual cleaning, according to the Better Boat pressure wash guide.
A clean hull makes routine ownership easier in ways that matter:
Practical rule: Clean for inspection first, appearance second. The shine is nice. Catching damage early is worth more.
There's also a mindset shift that helps. Boat care isn't very different from RV care, siding care, or exterior trim care. You're managing contamination, protecting finishes, and trying not to create damage while cleaning. If you handle multiple vehicles or seasonal property maintenance, this RVupgrades.com guide to RV deep cleaning is useful because the prep logic carries over well.
Pressure washing shines on broad, hard surfaces with bonded grime. It is not a substitute for every cleaning method on the boat. A washer is excellent for hulls, non-skid, trailers, and many exterior fiberglass surfaces. It's less forgiving around seams, electronics, soft materials, old decals, and compromised coatings.
Used correctly, it turns a dreaded cleanup into a repeatable maintenance routine. Used carelessly, it turns one dirty boat into several repair invoices.
Buying a boat power washer gets easier when you ignore marketing language and focus on two specs: PSI and GPM. PSI tells you how hard the water hits. GPM tells you how much water carries soil away. Boats need balance, not brute force.
For gel-coat fiberglass hulls, marine professionals commonly recommend 1,500 to 2,000 psi with 1.5 to 3.0 GPM, according to the TRHC boat pressure washing guide. That range is strong enough to clean effectively without turning the spray into a cutting tool. The same source notes that going beyond 2,500 psi or using a narrow-degree nozzle raises the risk of surface etching and gelcoat damage by 20 to 40% in reported cases.
Here's a practical table I'd use as a starting point.
| Boat Surface | Recommended PSI Range |
|---|---|
| Gel-coat fiberglass hull | 1,500 to 2,000 PSI |
| Painted hull sections | 1,500 to 2,000 PSI |
| Aluminum surfaces | 1,500 to 2,000 PSI |
| Non-skid decks | 1,500 to 2,000 PSI |
| Pre-rinse and soap application | 500 to 1,000 PSI |
That last line matters. Not every pass should be done at full working pressure. A lower-pressure pre-rinse and soap stage is safer and usually more effective than attacking dry grime with a harder jet.
For most owners, electric is the smarter call. Electric units are easier to control, quieter to run, and less likely to tempt you into using more pressure than the surface can tolerate. Gas machines have their place in commercial work, but many of them start in a range that is already more aggressive than most boat owners need.
If you're cleaning a boat on a trailer at home, in a storage yard, or near a dock where outlet access is awkward, battery-powered cleaners can still help for lighter rinsing and spot cleaning. A compact unit like the Ryobi One HP 18V brushless EZClean is not a hull-stripping machine, and that's exactly why it has value. It can be useful for controlled rinsing, windows, cushions, and light maintenance where mobility matters more than raw force.
The machine is only part of the setup. The accessories decide whether the job stays safe.
The wrong nozzle causes more damage than many people expect. A machine can be in the right PSI range and still become risky if the spray pattern is too tight.
Skip the pinpoint nozzles for boat surfaces. Skip the mindset that higher pressure is always faster. Also skip bargain detergents meant for driveways or degreasing shop floors. Boats need marine-safe cleaners and a setup that gives you control.
A good boat power washer setup should feel predictable in your hands. If it feels violent, it's probably wrong for the hull.
Most bad washing jobs were already doomed before the trigger was pulled. The boat wasn't stable, runoff had nowhere safe to go, vents were left open, and the operator was dressed like they were watering plants.
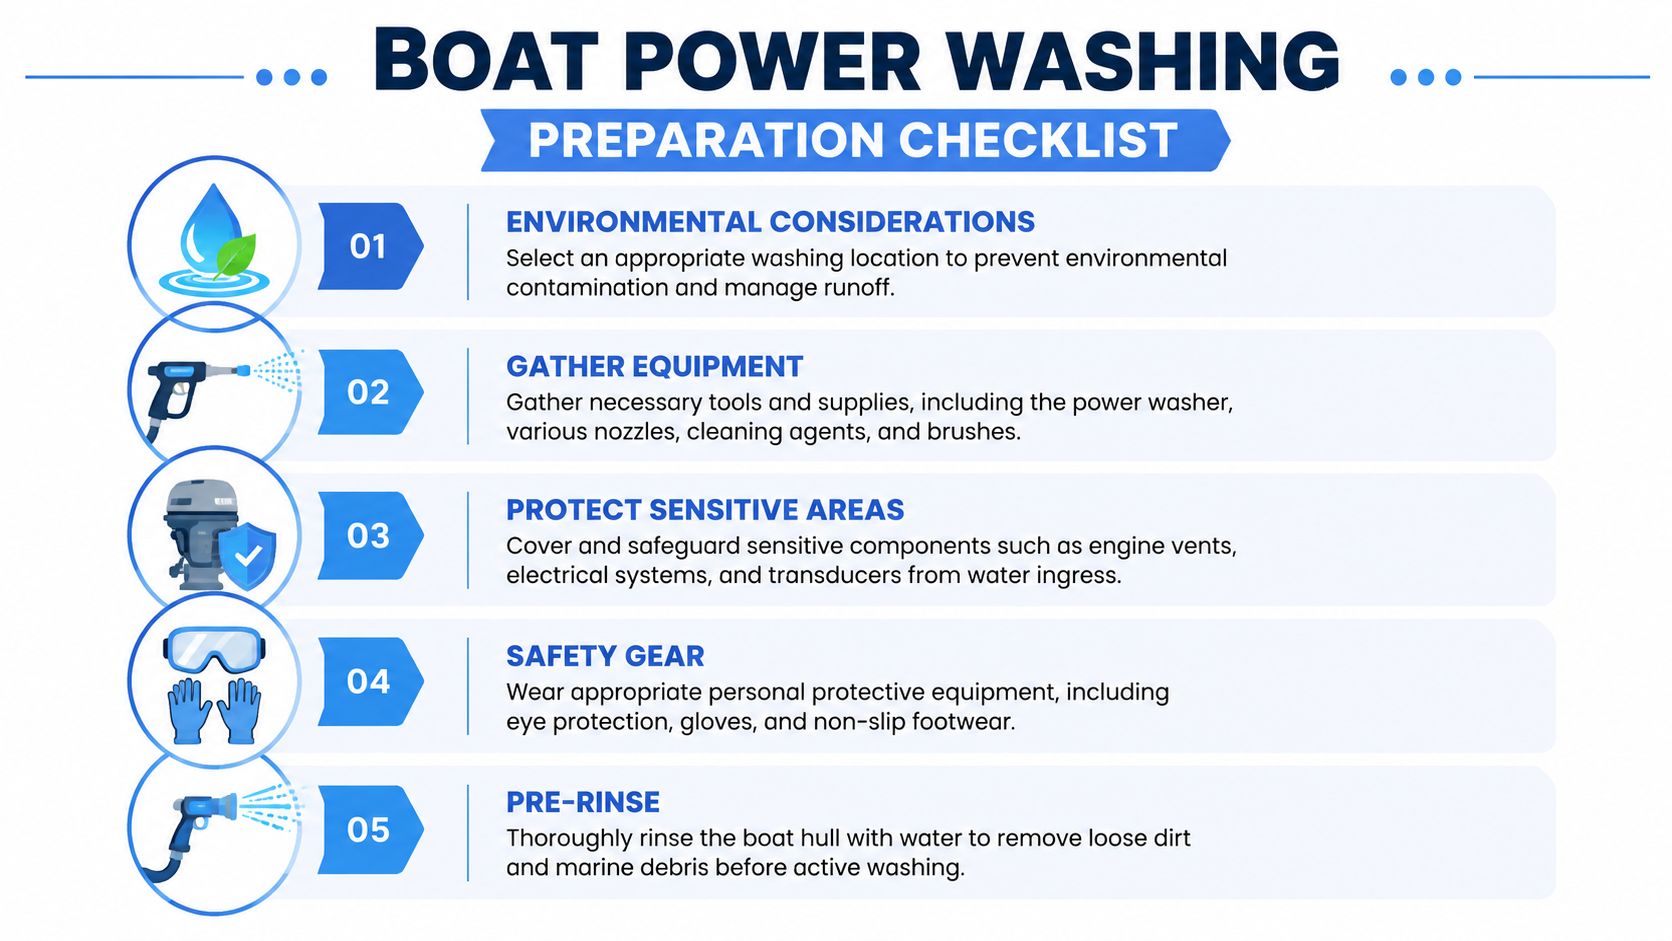
Before any washing starts, handle these five items:
Pick the right wash location
Don't wash where runoff heads straight into a storm drain, marina basin, or uncontrolled soil area. If you're at a marina or yard, ask first. Rules vary, and some locations only allow washing in designated areas.
Stabilize the boat
On a trailer, chock the wheels and confirm the boat is seated correctly. On blocks or stands, don't start if anything feels questionable. Pressure washing shifts your stance and body weight more than people expect.
Protect sensitive areas
Cover vents, exposed electronics, helm components, speakers, and any opening where direct spray could push water inward. Be careful around transducers, seals, and worn caulking.
Lay out your equipment
Put your nozzles, hose, soap, brush, extension cord if needed, and rinse tools where you can reach them without dragging lines across the hull.
Dress for the work
Eye protection, gloves, and non-slip footwear are basic requirements. Wet concrete, algae, and trailer frames make bad combinations.
A few boat areas deserve special caution:
Prep work feels slow until you compare it with replacing water-damaged electronics.
Do a simple low-pressure rinse or hose rinse first. Loose grit, dried salt, and dust can act like abrasives if you hit them immediately with concentrated spray. Knocking that material off first gives you a cleaner, safer starting surface and makes your detergent stage work better.
Good prep isn't glamorous, but it's what separates a clean boat from a damaged one.
Technique matters more than machine size. A disciplined process cleans more evenly, protects the finish, and prevents the common mistakes that leave streaks, dull patches, or water intrusion around fittings.

A professional workflow usually follows seven steps: pre-rinse, treatment, degreasing, hull wash, topside wash, detailing, and final rinse. According to the Giraffe Tools step-by-step boat detailing guide, that process cuts cleaning time on a 30-foot hull by 30 to 40% and reduces the risk of post-cleaning service calls for water intrusion by 15 to 20% compared with ad hoc spraying.
The first pass should be a pre-rinse. Use a lower-pressure setting and a wide fan pattern to remove loose dirt, sand, and salt. This does two things. It reduces the abrasive material on the surface, and it gives you a clear view of where the actual buildup is.
After that, apply your marine-safe cleaner. A foam cannon helps because it lays product down evenly and gives the chemistry time to loosen grime.
Don't try to win with pressure alone. Soap should loosen the contamination before the spray removes it.
Once the surface has been prepped, move to the main cleaning pass with a 25-degree to 40-degree fan tip. Keep the wand moving in slow, overlapping strokes. Work methodically rather than chasing stains randomly.
A few rules keep you out of trouble:
This next demonstration is useful if you want to see wand control, body position, and pass discipline in action.
The hull, topsides, and deck don't all need the same approach.
The hull usually carries the heaviest film and growth. Your boat power washer earns its keep here, but it's also where people get too aggressive. Let the cleaner dwell, then make long horizontal passes with a wide fan tip. For stubborn lines, repeat the pass before increasing intensity.
Topside cleaning is more about control than force. Rail bases, hatches, seals, fuel fills, and hardware create edges where spray can force water into places it doesn't belong. Reduce pressure around these features and change your angle so you're not driving water directly into seams.
Non-skid traps dirt well, so chemistry and angle matter. Spray across the texture rather than straight down into one spot. If residue remains, use a soft or medium marine brush instead of tightening the nozzle.
If you're also thinking about whether pressure washers make sense around glass and trim at home, this article on cleaning windows with a pressure washer is a useful reminder that water pressure and delicate finishes don't always mix well.
A pro wash looks calm. The wand moves evenly, the distance stays consistent, and the operator never seems rushed. That's the standard worth copying.
A boat can be perfectly washed and still look poor by the end of the day if the rinse and drying steps are sloppy. Soap left on the surface dulls the finish. Water left to evaporate on its own can leave spotting and residue, especially around hardware and glass.
Use a wide fan pattern and rinse from the highest point down. Don't just knock off visible suds. Chase residue out of rub rails, cleat bases, hinges, ladder mounts, and any recessed hardware where cleaner likes to hide.
Achieving a thorough rinse takes longer than expected. This process involves more than just removing soap; it clears trapped residue that can cause streaks later.
A boat that looks great when wet can look disappointing once the surface dries. The rinse decides which version you get.
For drying, I like a combination approach:
Don't use rough shop towels or anything that feels abrasive in your hand. A freshly cleaned finish shows careless drying marks immediately.
The best time to inspect a boat is right after it's clean. Look at:
A clean surface makes small problems easier to catch while they're still manageable.
Before you put the machine away, flush detergent from the system, relieve pressure, coil hoses without kinks, and inspect fittings and nozzles. Store the machine where freezing temperatures, dust, or sun won't punish the seals and hose.
If you use your boat power washer regularly, nozzle wear matters. A worn nozzle can change the spray pattern enough to affect both cleaning quality and safety. That's easy to overlook and easy to fix.
Boat washing isn't just a cleaning issue. It's also an environmental and liability issue. That becomes obvious the moment you deal with bottom paint residue, heavy hull contamination, marina rules, or a wash location where runoff control is not optional.
A 2002 Maine study found that runoff from pressure-washed boat hulls contained copper concentrations up to 170 ppm and lead up to 3.7 ppm, which helped drive stricter rules and best practices such as containment systems, as summarized by the Massachusetts guidance on issues with pressure washing at marinas. That's why many marinas care less about whether you own a washer and more about where the wastewater goes.
The main problem is runoff carrying contaminants from antifouling paints, bottom residues, grime, and chemical cleaners. Once that material leaves the wash area uncontrolled, it becomes someone else's water-quality problem. Marina operators know that. Regulators know that. Boat owners should know it too.
The practical takeaway is simple:
A lot of owners can safely handle routine exterior washing on a trailer in an appropriate location. The line changes when one of these factors shows up:
Dark gelcoat, aging graphics, fresh coatings, oxidized surfaces, and repaired sections all deserve extra caution. One bad nozzle choice can undo expensive finish work.
Helm stations, integrated speakers, lighting, vent systems, bonding points, and custom fittings raise the stakes. If the layout creates lots of intrusion points, a professional crew is usually cheaper than fixing mistakes.
If you don't have a legal, practical way to control runoff, the job may not be suitable for DIY at all. This is especially true in marinas and densely regulated waterfront properties.
The best reason to hire a pro isn't convenience. It's risk control.
Most consumer content on boat washing focuses on the owner and the machine. It says much less about operator training, liability, insurance, or workplace safety for people doing this work as a service. That gap matters. Professional washing around boats involves slip hazards, ladder hazards, overspray risks, electrical exposure, and potential water intrusion into expensive systems.
That's one reason experienced exterior cleaning companies build procedures instead of improvising. Good operators don't just know how to spray. They know where not to spray, what the site rules are, and when the smarter move is to switch methods entirely.
Call a professional when:
The same judgment applies across exterior cleaning. In window cleaning, professionals rely on only two proven methods: the squeegee and the pure-water system. That kind of method discipline matters. It's one reason trained crews with long field experience produce safer, more consistent results on valuable surfaces.
Usually, no. Most consumer-grade units are built for cold water, and boat finishes don't benefit from unnecessary heat. On hulls, decks, vinyl, and decals, cold water with a marine-safe cleaner is the safer choice.
Very carefully, if at all. Wood is much less forgiving than fiberglass, and aggressive spray can raise grain, etch the surface, or drive water where it shouldn't go. For many wooden boats, hand cleaning is the better method. If a washer is used, keep the pressure very low, use the widest practical fan tip, and keep the wand moving.
Start by removing the heavy shell buildup manually with a plastic or wooden scraper. After that, use the washer to clear remaining residue rather than trying to blast the entire barnacle off at full force. That approach is more controlled and usually safer for the surface underneath.
If you want help from an exterior cleaning team that values method, finish protection, and long-term property care, Professional Window Cleaning is a strong place to start. The company has been in business since 1999 and serves clients in Las Vegas, Phoenix, Denver, and Scottsdale, along with other service areas across Arizona, Colorado, and Nevada. Whether the job is glass, exterior surfaces, or a property that needs experienced hands and the right process, their team brings the kind of professional discipline that helps prevent costly mistakes.
Read our blog posts regularly and keep learning.