Care and Maintenance
Professional Window Washing: The Complete Guide to Spotless
Discover everything about professional window washing, from squeegee and pure-water methods to pricing, safety, and choosing the right service in AZ, CO, and


Before you even think about extending that ladder, let’s talk about the single most critical detail for keeping yourself safe: the angle. Getting this right is what separates a safe climb from a trip to the emergency room. Professionals live by a simple rule: a ladder should be set at a 75.5-degree angle.
Mastering this one detail is the key to preventing a disaster.
An improperly set ladder is behind a staggering number of accidents. Understanding the physics here isn't about scaring you—it's about giving you the knowledge to work with confidence. That angle is the sweet spot that prevents the base from sliding out or the top from tipping over backward.
This isn’t just a random number. Statistics from the CDC show that setting an extension ladder at the wrong angle is the culprit in about 40% of all ladder-related injuries. It’s the number one cause of falls, a risk we take seriously in service jobs like window cleaning in cities from Las Vegas to Phoenix.
As a company with over 26 years of experience, Professional Window Cleaning has seen it all. We know that mastering the correct ladder angle is a non-negotiable part of our daily work, ensuring both our team's safety and the protection of your property.
So, what makes that 75.5-degree angle the gold standard? It’s all about how your weight is distributed.
Too Steep: If you set your ladder too upright (steeper than 75.5 degrees), the center of gravity is off. The ladder becomes top-heavy and is dangerously likely to tip backward as soon as you start climbing.
Too Shallow: On the other hand, if the angle is too shallow (less than 75.5 degrees), you don't have enough force pushing the feet into the ground. The base is far more likely to slip out from under you, causing a catastrophic fall.
The 75.5-degree angle perfectly balances the vertical and horizontal forces, locking the ladder firmly in place. Whether you're a DIYer tackling a weekend project or a facility manager in a place like Scottsdale, AZ, getting this right is non-negotiable.
Of course, ladder placement is just one piece of the puzzle. Understanding general roofing safety is also key, as working at height involves many factors. With this foundational knowledge, we can now get into the practical ways to set that perfect angle every single time.
When it comes to setting up a ladder safely, there’s one guideline our pros live by: the 4-to-1 Rule. This isn't just some vague recommendation; it's the industry standard endorsed by OSHA that we use on every single job.
The concept is beautifully simple: for every four feet of vertical height your ladder reaches, its base must be one foot away from the wall. This straightforward ratio is what creates that ideal 75.5-degree angle—the sweet spot for maximum stability.
Getting this angle right is non-negotiable. It ensures the ladder’s weight is distributed correctly, which is crucial for preventing it from tipping backward or, even worse, sliding out from under you. This is the exact method our crews at Professional Window Cleaning rely on to guarantee a rock-solid setup before a single squeegee touches the glass. Professional window cleaning is done with only two methods: a squeegee or a pure-water system.
The infographic below shows exactly what’s at stake.
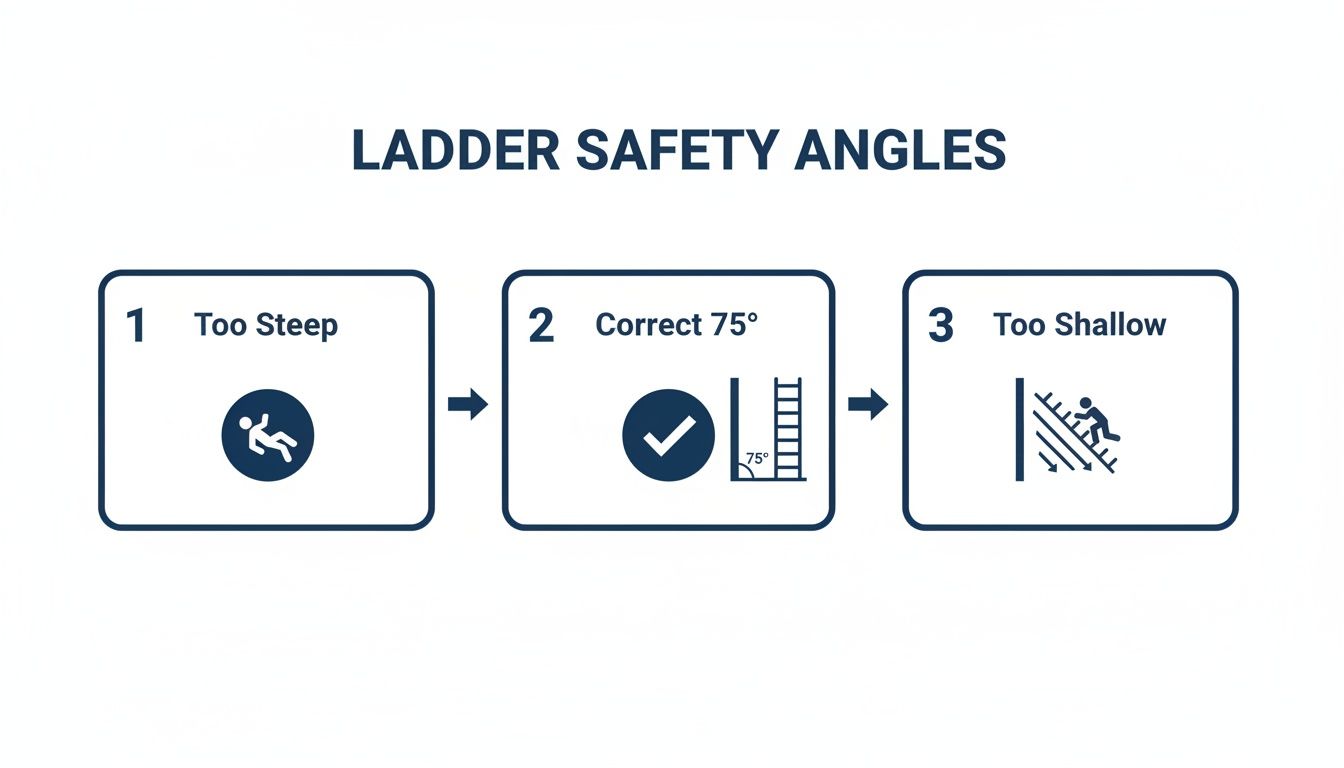
As you can see, an angle that’s too steep creates a serious tipping hazard. Go too shallow, and the base can easily slide out. That 75-degree sweet spot is where safety and stability meet.
While the rule itself is simple, applying it correctly on a job requires a bit of care. Our experienced teams, whether working on a home in Denver, CO, or a multi-story commercial building, will often pull out a tape measure for taller setups. Precision is everything when you're working at height.
To take the guesswork out of it, we put together this quick reference table. It’s a handy cheat sheet for finding the perfect base distance.
Use this table to quickly find the correct distance to place the base of your ladder from the wall based on the ladder's working height.
| Ladder Working Height (Top Support Point) | Required Base Distance from Wall |
|---|---|
| 12 Feet | 3 Feet |
| 16 Feet | 4 Feet |
| 20 Feet | 5 Feet |
| 24 Feet | 6 Feet |
| 28 Feet | 7 Feet |
Professional Window Cleaning has been cleaning windows for over 26 years! Over time, our technicians develop a keen sense for this distance, but we always advocate for measuring when in doubt. There is no substitute for certainty when your safety is on the line.
Following this simple chart is one of the easiest ways to guarantee you are setting a safe and correct angle for your ladder every time. No math, no fuss—just a quick check to ensure a secure climb.
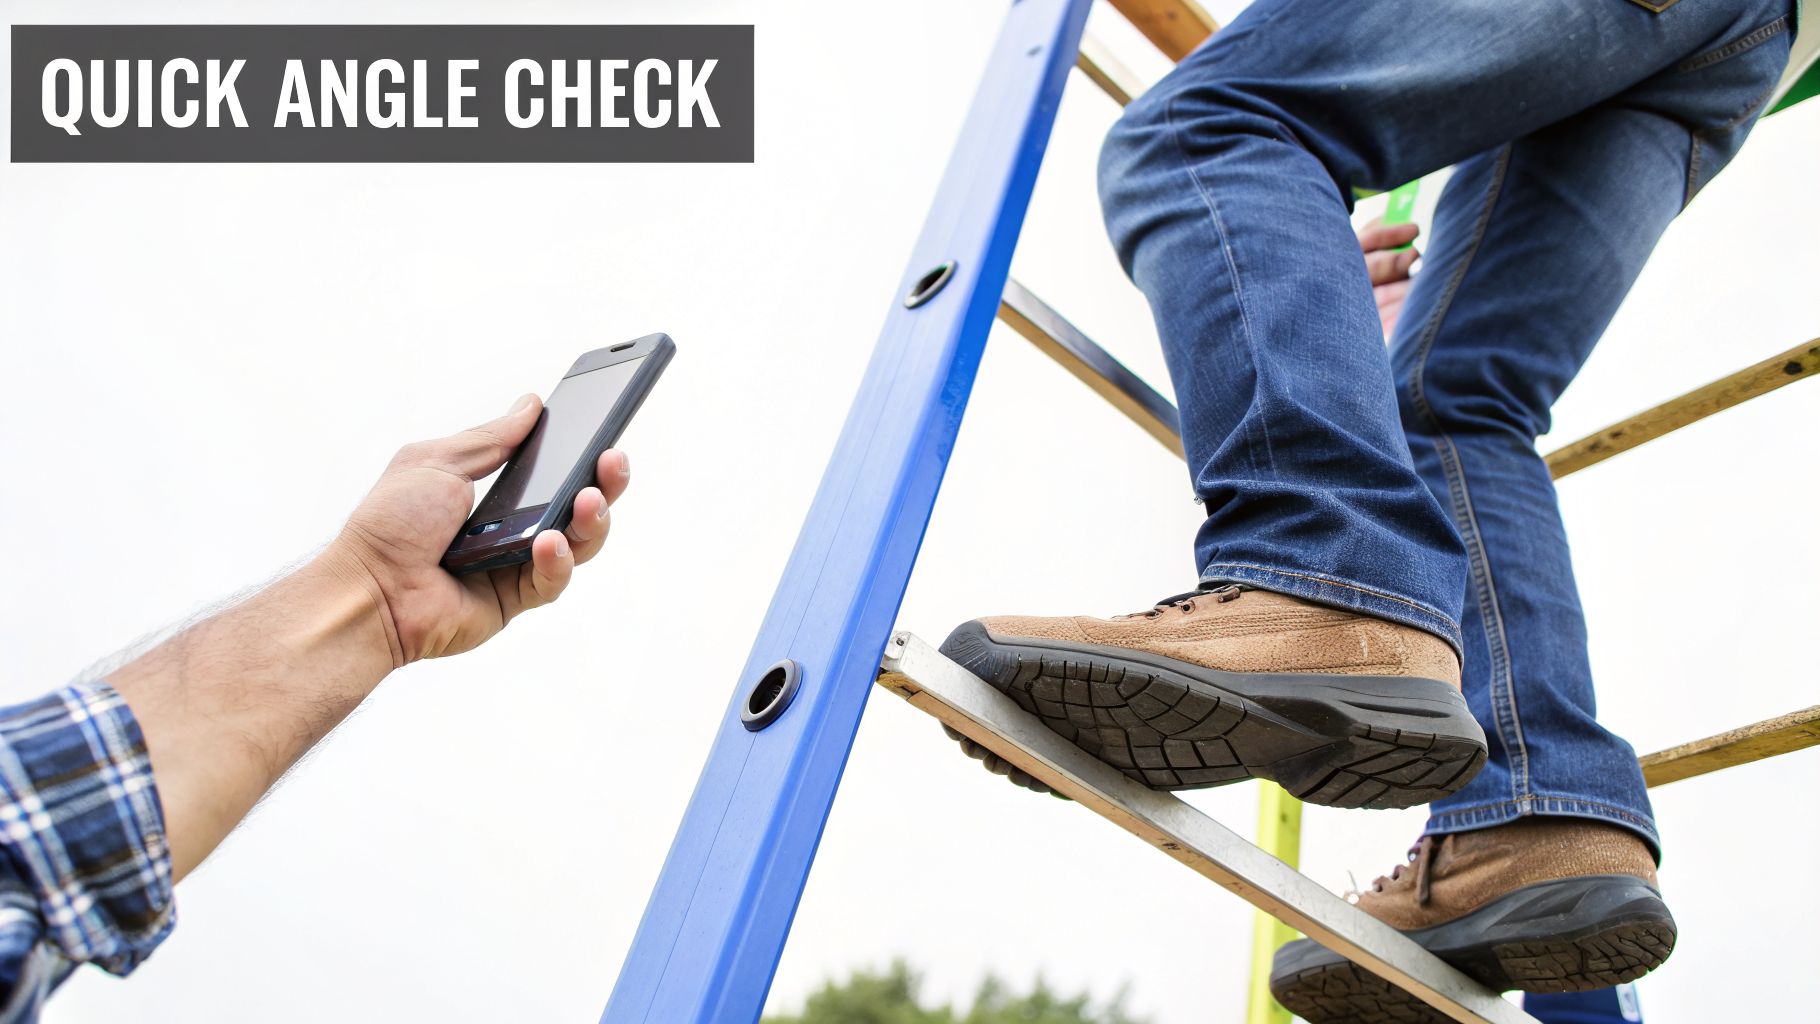
So, you’ve set up your ladder, but you left your tape measure in the truck. What now? You don’t have to just eyeball it and hope for the best. There are a couple of fantastic, field-tested tricks that the pros use to get a quick and accurate read on the ladder’s angle without any special gear.
These simple checks take just a few seconds but give you reliable confirmation that your setup is stable. Making these a habit is one of the smartest things you can do on any job.
This is a classic for a reason. It’s a quick, physical way to feel out your ladder’s angle, and it’s surprisingly accurate. All you need is yourself.
If you find yourself leaning in to reach the rung, or your hands are bent back, the base is too far out. If you can’t reach it at all, the base is too close. Just make a small adjustment and try the test again.
Here’s another great method using a tool you’re already carrying. Nearly every modern smartphone has a level or angle finder built into its compass or measure app. It’s a perfect digital confirmation.
To get a reading, just open the app and place the long edge of your phone flat against one of the ladder’s side rails. The screen will give you an instant measurement, which should be very close to 75.5 degrees.
This quick digital check offers immediate peace of mind. Our window cleaning teams, who work on homes and businesses everywhere from Phoenix, AZ, to Scottsdale, use these methods all the time. It allows them to verify a safe setup in seconds without slowing down the job, whether they’re using a traditional squeegee or a modern pure-water system.
Getting the ladder angle right is a huge part of the safety equation, but it’s only half the story. A perfect 4-to-1 setup on unstable ground is still an accident waiting to happen. Before you even think about climbing, you need to run through a quick but critical check of your surroundings and your gear.
This is the exact pre-climb routine that has kept our Professional Window Cleaning crews safe for over 26 years. It takes less than a minute, but that minute could save you from a serious fall.
Always start your inspection from the ground up. The surface holding your ladder is its foundation, and if that’s not solid, nothing else matters.
These simple checks are your first line of defense against ladder slippage. Of course, personal gear is just as important; a complete guide to safety supplies can be a great resource to make sure you have all the necessary personal protective equipment.
Now, look up. Where the ladder leans against the building is just as important as where it stands. The top of the ladder rails must rest squarely against a solid, flat surface. Never, ever lean it on a flimsy gutter, a window pane, or a weak fascia board.
If you’re climbing onto a roof, your ladder needs to extend at least three feet above the edge. This gives you something secure to hold onto as you get on and off the ladder.
For extra security, especially if you'll be up there for a while or if it's a bit windy, tie off the top of the ladder. Securing it to a stable anchor point will stop it from shifting sideways or getting knocked over.
Finally, a rule we drill into all our crews: always maintain three points of contact. That means two hands and one foot, or two feet and one hand, on the ladder at all times. This simple habit is a core safety principle that keeps our teams safe on jobsites everywhere, from residential homes to commercial buildings in cities like Las Vegas, NV.
In a perfect world, every ladder setup would be on flat, solid concrete. But we don't work in a perfect world. Job sites are full of soft soil, sloped driveways, and delicate surfaces that require you to think on your feet. Getting the ladder angle right is half the battle; the other half is making sure it's secure on less-than-ideal ground.
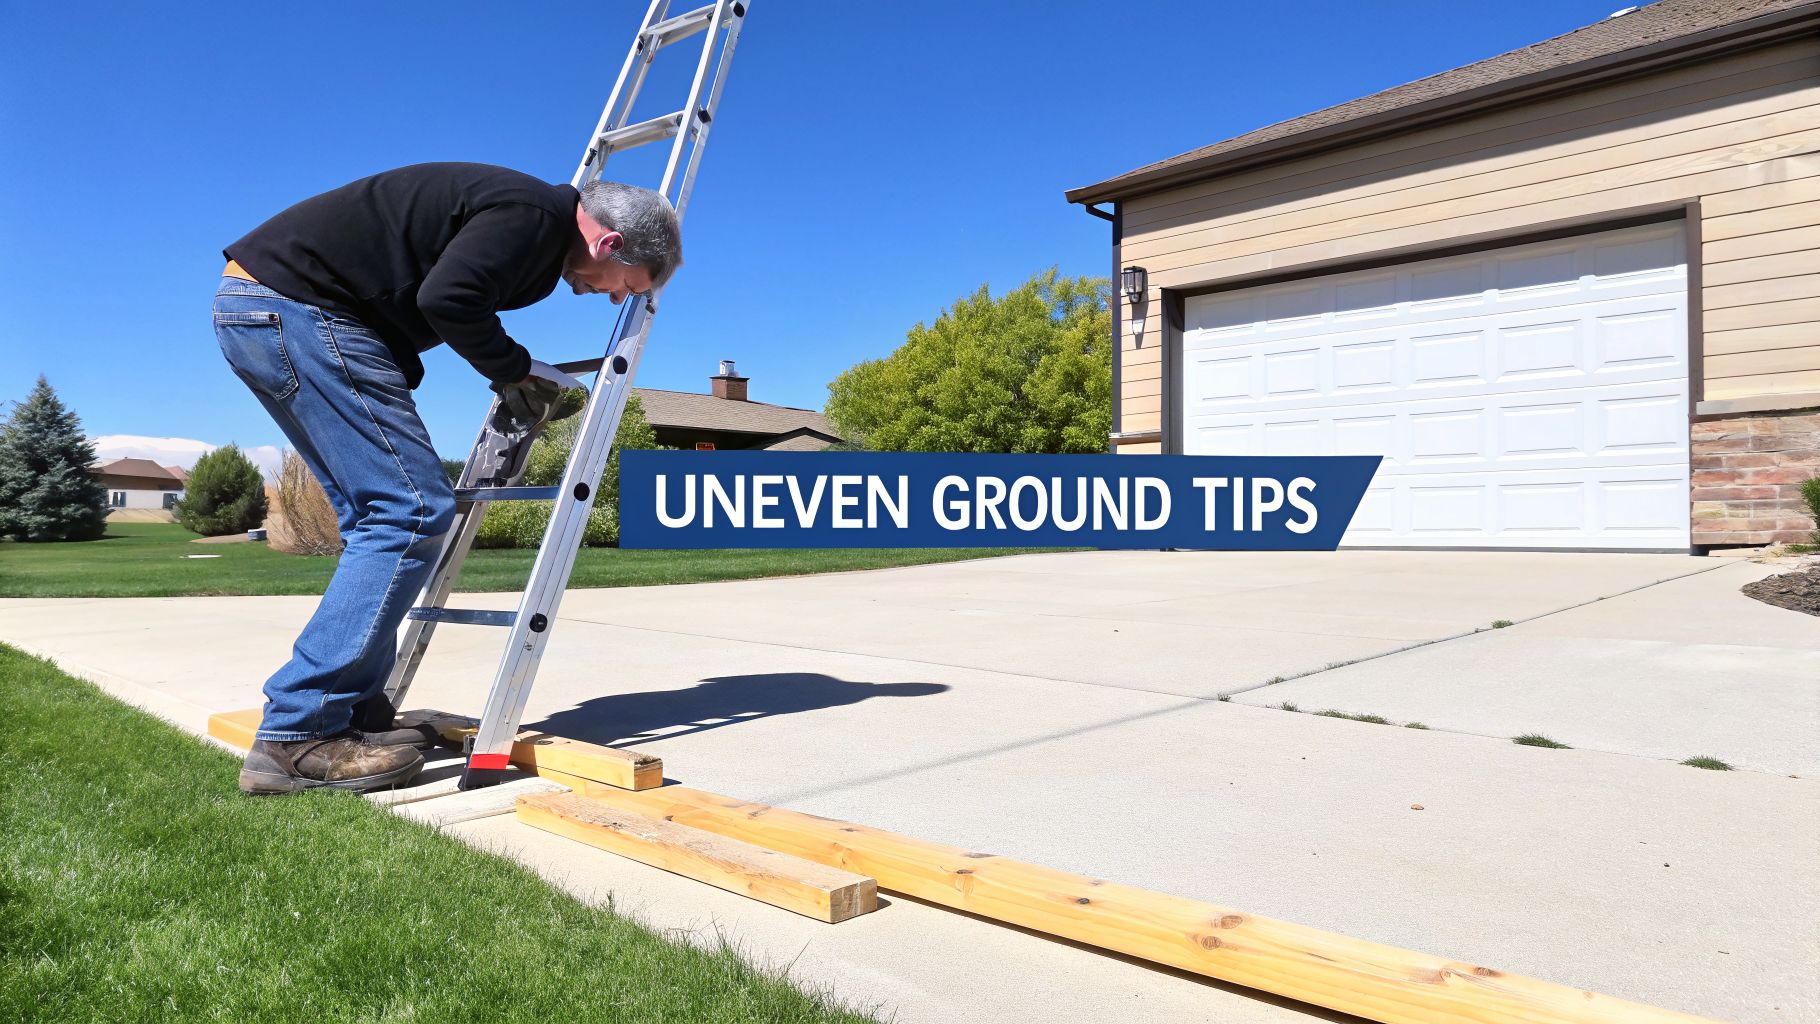
This is a daily reality for our window cleaning crews, whether we're navigating the landscaped yards of Las Vegas, NV, or setting up on commercial properties in Denver with all sorts of funky terrain. Thankfully, the right tools make these situations manageable.
When you’re dealing with a slope or an uneven patch of ground, your go-to tools should be ladder levelers or leg extensions. These are lifesavers. They attach right to the ladder’s legs and adjust independently, allowing you to create a solid, level base even if one foot is several inches higher than the other.
For soft ground like mulch, grass, or damp soil, the ladder feet can sink in and become unstable. A simple but effective trick is to place a wide, sturdy board underneath both feet. This distributes the ladder's weight across a larger surface, giving you a firm foundation to work from.
Over our 26 years of professional window cleaning, we've learned that a few extra moments spent stabilizing the base is the most important part of the job. Adapting to the environment is what separates a safe professional from a reckless amateur.
Your mission is to clean the windows, not break them. Never lean your ladder directly against the window frame, and absolutely never against the glass itself. That’s just asking for a costly accident. This is where a couple of key accessories come into play.
Using these tools is non-negotiable, whether you’re using a traditional squeegee or a modern pure-water system. They protect your client's property and provide the secure footing you need to do the job right. If you're building out your kit, you can learn more about professional window cleaning equipment in our detailed guide.
There’s a ton of satisfaction in a job well done, especially when you do it yourself. While we're all for that can-do spirit, wisdom is knowing when to step back. Recognizing when a window cleaning job has crossed the line from a weekend project into professional territory is a sign of a smart, safe property owner.
Some situations are immediate red flags. When you see them, it’s time to put the ladder away and pick up the phone.
This shot from our Las Vegas, NV, services page is a perfect example of what we mean. Tackling jobs at this scale without extensive training and specialized safety equipment isn't just a bad idea—it’s incredibly dangerous.
Extreme height is the most obvious deal-breaker. As a general rule, any work that takes you above a second story dramatically increases the risk of a fall, which can easily lead to serious injury. In fact, over 500,000 people are treated for ladder-related injuries each year.
But height isn't the only hazard. Keep an eye out for these other major warning signs:
Professional Window Cleaning has been cleaning windows for over 26 years! For home and business owners in the cities we serve, your safety isn't worth the risk. Our insured, experienced teams have been handling these complex jobs safely for over two decades. You can get a closer look at how the pros handle these challenges in our guide on how to wash high windows.
When you need a job done safely and correctly, trust the experts. For a flawless, streak-free shine without the risk, contact Professional Window Cleaning today to get your free estimate.
Read our blog posts regularly and keep learning.