Care and Maintenance
Professional Window Washing: The Complete Guide to Spotless
Discover everything about professional window washing, from squeegee and pure-water methods to pricing, safety, and choosing the right service in AZ, CO, and


A chandelier usually doesn’t look dirty all at once. It just stops throwing light the way it used to. The crystal looks flatter, the metal loses its sharp detail, and the whole fixture starts reading as background instead of centerpiece.
That’s the moment when many begin searching for a chandelier cleaner spray. The product matters, but the result comes from technique. After more than 26 years in professional cleaning, that’s the part I trust most. In window cleaning, pros rely on only two methods: the squeegee or the pure-water system. Different surfaces require different tools, and chandeliers are no exception.
A lot of homeowners assume there must be a special, universal product category for chandeliers. In practice, that isn’t really how the market works. There’s limited evidence of any globally recognized, standardized product category specifically branded as “chandelier cleaner spray.” What’s widely sold are multi-surface glass cleaners that homeowners and professionals adapt for crystal and glass fixtures. Public market data show the broader glass cleaner segment generated roughly USD 180 million in U.S. retail sales in 2021, but that reporting doesn’t break out a separate chandelier-spray category, according to Statista’s U.S. glass cleaner retail sales data.

That’s good news if you’re standing under a dusty fixture and wondering where to start. You don’t need to chase a mystery product. You need a cleaner that suits the material, a way to control drips, and a method that doesn’t create new problems around wiring, finishes, or flooring.
The biggest mistake I see is treating a chandelier like a regular piece of decor. It isn’t. It’s glass, metal, hardware, bulbs, sockets, and often delicate finishes all in one assembly. A spray that works fine on a bathroom mirror can be the wrong choice for antique brass, lacquered arms, or older electrical components.
Practical rule: Clean the fixture you actually have, not the one on the label photo.
Most DIY problems come from one of three places:
For homeowners in Las Vegas or Phoenix, chandeliers often collect a mix of normal indoor dust plus fine airborne grit. That changes how the job should be approached. Dry dust may come off easily. Dust mixed with grease or residue needs more control and more patience.
A chandelier cleaner spray can absolutely help. Used properly, it simplifies the work. Used carelessly, it can leave residue, spot the frame, and send dirty runoff onto furniture below. The shine comes from matching the cleaner, the fixture, and the method.
Before you spray anything, identify what the chandelier is made of. Crystal or glass drops are only part of the job. The frame may be brass, bronze, chrome, lacquered metal, painted metal, or a decorative finish that doesn’t tolerate aggressive cleaning well.
Some cleaners are sold as drip-dry formulas. Others are meant to be sprayed and wiped. Neither is automatically better. The right choice depends on how intricate the chandelier is, how dirty it is, and how sensitive the surrounding materials are.
If you’re shopping for a chandelier cleaner spray, focus on these label cues:
Many common cleaners can damage specialty materials. Vinegar solutions and some commercial sprays can etch or tarnish brass, bronze, and certain lacquered finishes, which creates real risk on higher-end fixtures, as noted in this discussion of material risks in professional cleaning.
You don’t need a truckload of gear, but you do need the right support tools.
If you want a broader refresher on pro-grade gear, this guide to window cleaning supplies is useful because the same habits apply. Good tools reduce rework.
| Material | Recommended Cleaner | Method | Warning |
|---|---|---|---|
| Crystal or clear glass | Non-abrasive glass-safe spray | Light, even application with controlled runoff | Don’t oversaturate near sockets |
| Chrome or polished metal | Mild glass-safe cleaner on cloth first if needed | Wipe metal separately after crystal work | Direct spray can leave spotting in seams |
| Brass | Mildest compatible cleaner, test first | Spot clean carefully | Vinegar and some sprays can tarnish |
| Bronze | Mild cleaner, test on hidden area | Minimal moisture | Harsh chemistry can discolor finish |
| Lacquered finishes | Cleaner applied very sparingly | Cloth-first approach is safer | Strong cleaners can damage coating |
| Antique or unknown finish | Test first and proceed cautiously | Manual detail cleaning | Don’t assume modern spray chemistry is safe |
If you can’t identify the finish, treat it like a fragile one until proven otherwise.
A clean chandelier starts before the first spray. The job goes smoother when the room is protected, the power is off, and you’ve decided in advance whether you’re doing a drip-dry clean or a more hands-on detail clean.
Modern drip-dry products can be a major time saver. Some product guidance states they can cut a standard fixture from 2 to 4 hours with traditional disassembly methods down to 15 to 20 minutes, a 75 to 80 percent reduction in labor, according to Brilliante’s chandelier cleaner overview. That kind of reduction is exactly why spray methods appeal to homeowners and service crews alike.
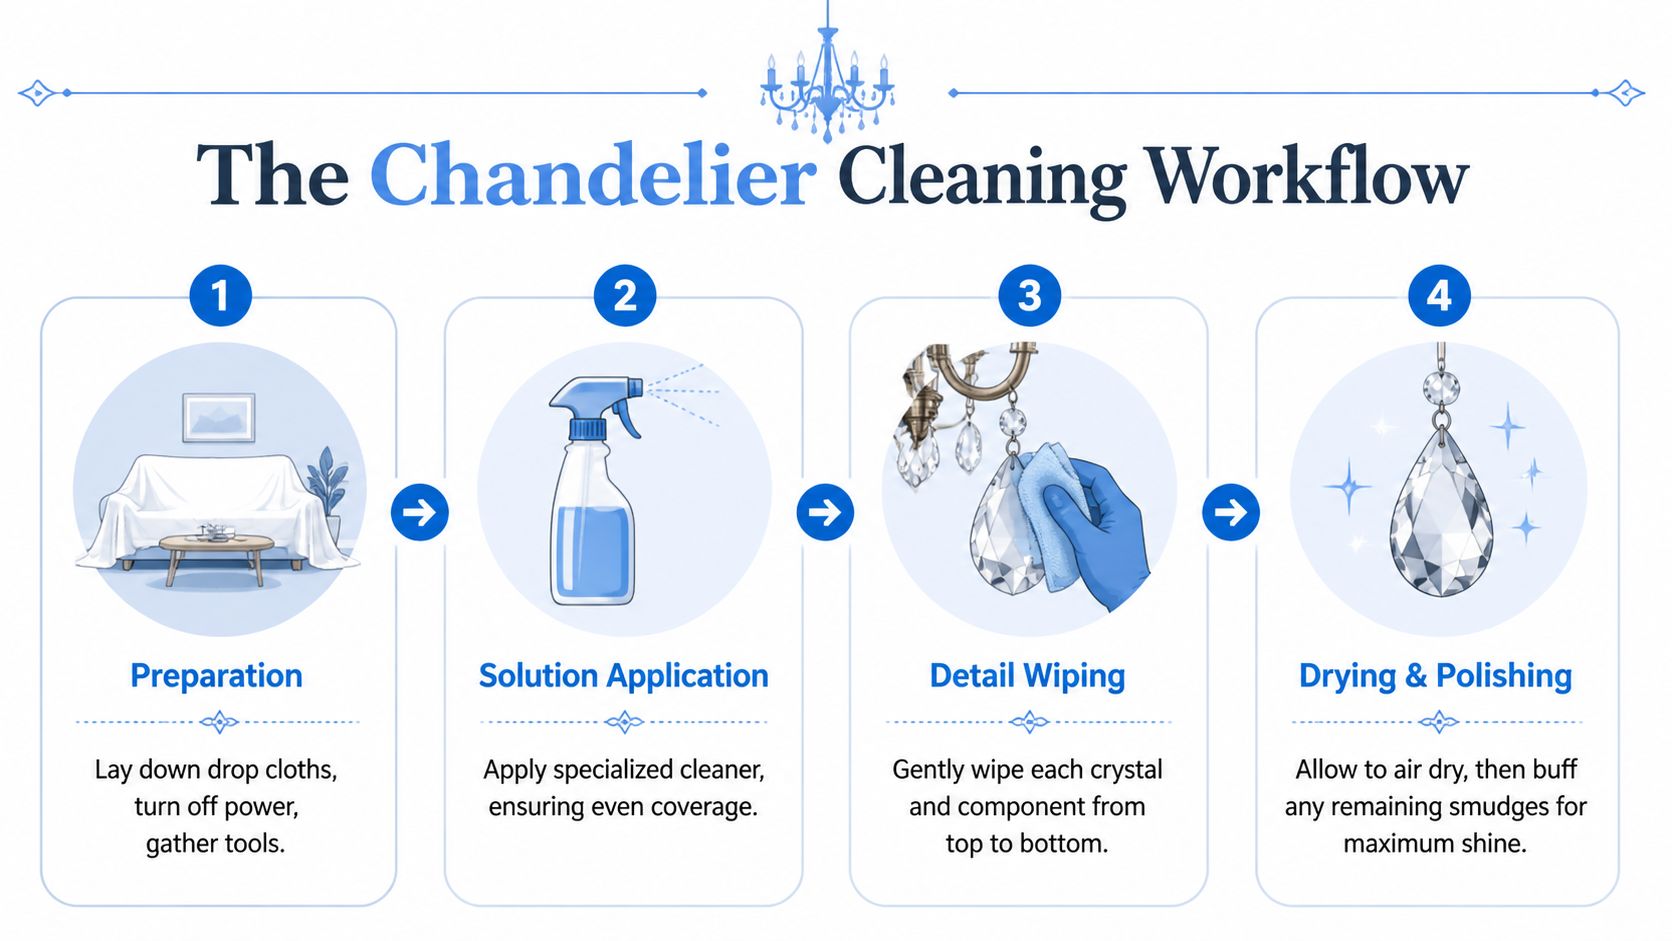
Turn off the fixture and let every bulb cool fully. Protect the floor and anything directly below the chandelier. If the fixture hangs over a table, clear it if possible. If it hangs over a stair opening or high foyer, stop and evaluate whether the access is safe.
Gather your spray, microfiber cloths, gloves, ladder, and a dry cloth for final touch-up. If the chandelier has fabric shades, decorative wraps, or exposed wood details, shield those before spraying.
The correct direction is top to bottom. That lets gravity carry loosened dust and grime downward instead of across already-cleaned pieces. Professional guidance also stresses calibrating dwell time to soil level, and notes that complete evaporation typically takes 10 to 15 minutes in standard room conditions, based on review-based application guidance for chandelier cleaner use.
Don’t blast the fixture. Apply enough cleaner to wet the crystal surfaces evenly, but not so much that liquid is driven into electrical components. More spray doesn’t equal a better clean. It usually equals more runoff and more touch-up.
A good visual reference can help if you’re trying to avoid streaks on crystal and surrounding glass surfaces. These best practices for clean glass line up well with the same discipline used on decorative fixtures.
Let the cleaner do the work. Often, people become impatient and begin wiping prematurely. If the chandelier only has light dust, the dwell period can be short. If it has built-up grime, kitchen residue, or smoke film, it may need more time before runoff clears.
Watch the lower points of the fixture. Dirty runoff tells you the cleaner is pulling contamination down. If sections dry with visible residue, use a microfiber cloth for selective correction instead of re-soaking the whole fixture immediately.
Let gravity work for you. Chandeliers clean better when the runoff has a clear path and the room below is protected.
Once the crystal has dried, inspect from multiple angles. Overhead light alone won’t show everything. Side light or daylight from a nearby window will reveal streaks faster.
Use a dry microfiber cloth for:
If you find widespread residue, the issue usually wasn’t the chandelier cleaner spray itself. It was overspray, dirty runoff collecting on lower surfaces, or using a product that wasn’t right for the finish.
A chandelier can survive a sloppy cleaning once and still look fine from the floor. The damage often shows up later. Brass starts dulling unevenly. Lacquered areas lose consistency. Fine crystal develops a haze that won’t buff out easily.
That’s why material-specific safety matters more than marketing language. “Safe on glass” doesn’t mean safe on every part of a chandelier.

The vulnerable part usually isn’t the hanging crystal. It’s the mixed materials around it.
This is the same kind of mistake pattern you see in other maintenance jobs. People rush, use the wrong tool, and assume the damage will be obvious right away. That’s why guides on dryer vent cleaning mistakes are useful outside their category too. The lesson is universal. Systems fail at the weak point you ignored.
If the finish is unknown, test first on a hidden spot. Don’t test on the most visible arm, cup, or center column. Apply a small amount, let it sit briefly, and inspect after drying. If the finish changes tone, dulls, gets tacky, or shows uneven shine, stop.
For fixtures with both crystal and decorative metal, separate the tasks mentally. Clean the crystal as one surface system. Clean the frame as another. That mindset prevents the common mistake of spraying everything the same way.
A more general guide to the best glass cleaner can help you think through chemistry choices, but chandeliers always require an extra layer of caution because the surrounding materials vary so much.
Unknown finish means low-moisture testing first. That habit saves expensive fixtures.
Top-to-bottom application isn’t only about cleaning efficiency. It limits random runoff and gives you more control over where liquid travels. Dwell time matters for the same reason. Light dust needs less contact. Heavier grime may need longer. If you overshoot either one, cleaner can pool where it shouldn’t.
When you’re working around sockets, arms, chains, and decorative cups, restraint beats speed every time.
A chandelier stays brighter with light maintenance than with occasional rescue jobs. Dusting before buildup hardens is easier on the fixture, easier on the finish, and easier on whoever has to clean it.
That doesn’t mean every chandelier should be cleaned the same way. Some are straightforward. Others should never be treated like a casual weekend project.

A practical routine looks like this:
In homes with open foyers, larger windows, and more airborne dust, chandeliers need more attention. That’s especially true in properties with tall entries and large statement fixtures, including many homes in Scottsdale.
Call a professional when the risk comes from access, value, or liability.
One-story dining room fixture with solid ladder access and known materials? That’s often manageable.
A chandelier hanging above a curved staircase, suspended in a two-story foyer, or mounted in a commercial atrium is a different decision. For property managers in places like Las Vegas or Denver, DIY cleaning of lobby or multi-story fixtures carries significant safety concerns. Professional service becomes important for OSHA compliance, liability insurance, and properly rated aerial-work equipment, as noted in this discussion of cleaning tall or complex chandeliers in commercial settings.
Some fixtures aren’t especially high, but they’re still poor DIY candidates:
If you already suspect wiring issues, cleaning and electrical work shouldn’t be mixed casually. A qualified lighting contractor is the right call for anything involving repairs, removal, or replacement. This overview of expert electrical fixture installation is a useful reminder that cleanliness and electrical safety are separate skill sets.
The right time to hire help is before access becomes improvisation.
A chandelier cleaner spray can be an excellent tool, but it isn’t magic. Good results come from three things. Preparation, material awareness, and controlled application. Skip any one of those and the fixture may still look cleaner, but not cleaner in a way that protects its finish and structure.
The best approach is usually the least aggressive one that still gets the job done. Protect the room first. Match the cleaner to the materials. Spray with control, not force. Then inspect carefully after drying instead of assuming the shine tells the whole story.
That’s the professional mindset after decades in cleaning. Tools matter. Method matters more.
If the chandelier is unusually high, unusually valuable, or installed in a commercial space, it’s smart to bring in people who work around access equipment and glass at height every day. Homeowners and property managers in Denver especially know that tall interiors and complex access points can turn a simple plan into a risky one fast.
You can, but homemade mixes are where people get into trouble with metal finishes. If you use a DIY solution, keep it mild, use very little of it, and test it on a hidden area first. Don’t assume a homemade vinegar mix is safe for brass, bronze, or lacquered components.
That usually means the fixture has more than dust on it. Kitchen grease, smoke residue, or old buildup often needs targeted hand cleaning with microfiber rather than repeated soaking. Re-spraying the whole fixture over and over usually creates more runoff and more risk.
Not always. A drip-dry product can handle light to moderate soil well when it’s applied correctly. Hand detailing makes sense for missed spots, lower pieces where runoff collects, or fixtures with mixed materials that need more control.
Turn power off, let bulbs cool completely, and clean them only when dry handling is safe. Use a soft dry or slightly damp microfiber cloth, then dry them fully before restoring power. Don’t spray bulbs directly while they’re installed.
Using too much liquid. Most problems start there. Once cleaner gets into sockets, decorative cups, or sensitive finishes, the job shifts from cleaning to damage control.
If your chandelier is high, delicate, or part of a larger glass and fixture maintenance plan, Professional Window Cleaning can help. We’ve been serving homes and commercial properties since 1999, and after more than 26 years in the field, we know when a careful DIY clean makes sense and when specialized access, safety practices, and professional results matter more.
Read our blog posts regularly and keep learning.