Care and Maintenance
Las Vegas Hi Rise Window Cleaning: Methods and Safety
Learn how Las Vegas Hi Rise window cleaning works: the two professional methods, OSHA safety rules, wind, glass conditions and how to vet a provider.


The window over the kitchen sink has a film on it that won't come off with the spray you've used for years. You've tried the blue bottle, then a paper towel, then a razor blade on a stubborn spot, and now there's a faint line that catches the light at the wrong angle. If that glass is low-E, none of those steps were neutral. Each one took something off the pane that doesn't grow back.
Low-E glass is standard on most windows built in the last couple of decades. Its coating is a microscopically thin metallic layer that reflects heat while letting light through, and it's the reason generic window advice fails. The same bottle can be right for one pane in a house and wrong for the one beside it, depending on which coating sits on which surface. Knowing how to clean low-E glass comes down to identifying what you're standing in front of, then following one sequence that matches that coating.
Most low-E damage happens before the cloth touches the glass. It happens on the shelf, when a hand reaches for the ammonia spray out of habit, and at the bucket, when a gritty rag comes out of the wash. The coating is thin enough that a single trapped particle dragged across it leaves a mark no polish will remove.
The core kit is short. A clean, soft, lint-free microfiber or cotton towel, a mild detergent or glass-cleaning solution, and deionized water for the final rinse. Deionized water dries without leaving mineral spots, which is why it earns a place in the bucket instead of tap water. Inspect every cloth before it goes on a pane. A towel that has been dropped on a driveway or wiped along a sill goes in the wash, not on coated glass.
Pilkington's technical bulletin on cleaning low-E coated glass is blunt about what causes permanent-looking defects. It prohibits razor blades, steel wool, and other metallic objects on the coated surface, and explains that a blade can leave metal particles behind that read as scratches. The same guidance rejects hydrofluoric acid, harsh chemical cleaners, and abrasives, and warns that abrasive material trapped inside washing equipment damages both the glass and the coating (Pilkington low-E cleaning bulletin).
The squeegee needs a decision, not a habit. Manufacturers advise keeping a blade off the coated surface where possible. Where the maker allows it, use a clean, soft blade, check the channel for trapped grit every few passes, and never let metal contact the glass. Vitro's recommendation follows the same line: mild soap or glass-cleaning solution, generous wetting, a clean soft lint-free cloth, and a squeegee only if its metal components stay off the coating.
The vinegar question deserves a straight answer. A published low-E cleaning guide calls for one part white vinegar to ten parts water, flooded on and worked with a lint-free towel, and warns against ammonia and alcohol cleaners that dry into streaks (Low-E glass cleaning guide). That recipe is fine on bare glass and on many hard-coat surfaces. It is not universal. Vinegar sits on the list of chemicals that can attack certain vacuum-coated products and the sealants around them, so skip it unless the glass maker approves it for that specific product.
Tools and products: use or avoid on low-E glass
| Tool or product | Use it for low-E | Avoid it on the coated surface |
|---|---|---|
| Soft, clean, lint-free microfiber or cotton towel | Wet cleaning and final drying | Shop rags with grit or lint |
| Mild detergent or glass-cleaning solution | Routine dirt and film | Strong or abrasive cleaners |
| Deionized water for the final rinse | Preventing mineral spots | Hard tap water left to dry |
| Squeegee with a clean, soft blade | Drying large panes, if the maker allows it | Metal channels or a dirty blade touching the coating |
| Razor blade or metal scraper | Nothing on coated glass | Leaves metal particles that look like scratches |
| Steel wool or abrasive pad | Nothing on coated glass | Scratches the coating permanently |
| Ammonia or alcohol spot cleaner | Nothing on coated glass | Dries into visible streaks |
| Hydrofluoric acid or harsh chemical cleaner | Nothing | Can permanently alter the coating |
| Vinegar solution at 1 to 10 | Only if the manufacturer approves | Can damage vacuum-coated glass and seals |
Film is a different job with a different set of rules, and the sequence for how to clean tinted window film is worth reading separately so the two procedures don't get mixed on the same ladder.
The bottle isn't the variable. The pane is. Two windows on the same wall can carry different coatings, one exposed to the room and one sealed inside the unit, and the chemistry that's safe on the first can attack the second. That identification step runs before any water comes out.
The sequence below is what the work looks like once the coating has been confirmed.
Hard-coat (pyrolytic) low-E is applied during manufacture while the glass is still hot. It's the tougher of the two, it often sits on an exposed surface, and it tolerates normal handling. Soft-coat (vacuum or MSVD) is deposited in a vacuum chamber after manufacture, is delicate, and usually sits inside a sealed double-glazed unit on surface 2 or 3, where cleaning never touches it.
Consumer instructions rarely make that distinction, even though the permissible chemistry differs substantially. Neutral guidance says mild detergent and water are fine for hand washing. Guidance for vacuum-coated products warns that solvents and strong chemicals, including alcohol, petroleum solvents, fluorine compounds, vinegar, and ammonia, may damage the coating, the insulating-unit sealants, or both (Pilkington Eclipse Advantage fabricating guidelines). "Glass cleaner" is not a precise enough answer for a building with mixed windows.
Hard-coat and soft-coat low-E at a glance
| Feature | Hard-coat (pyrolytic) | Soft-coat (vacuum or MSVD) |
|---|---|---|
| How it is applied | During glass manufacture while the glass is hot | Deposited in a vacuum chamber after manufacture |
| Durability | Tougher and more tolerant of handling | Delicate and easily scratched |
| Usual position | Often on an exposed surface | Usually inside a sealed double-glazed unit |
| How to check | Label, installation paperwork or the maker | Label, installation paperwork or the maker, then a test patch |
Check in this order: read the label printed in the pane corner and any installation paperwork, then ask the installer or window maker which product was fitted. If it's still unclear, run a test patch on a small hidden corner and inspect it after 24 hours. A coating that has been attacked looks hazy, slightly iridescent, or uneven next to clean glass.
The video shows the hand method. The numbered sequence after it is the version worth following on coated panes.
Confirm the coated surface and the maker's instructions before you wet anything. The National Glass Association's architectural-glass guidance states that coated surfaces require specific cleaning procedures and that the manufacturer's instructions should be consulted first (NGA architectural glass cleaning procedures). Note what the label says. No label means a test patch.
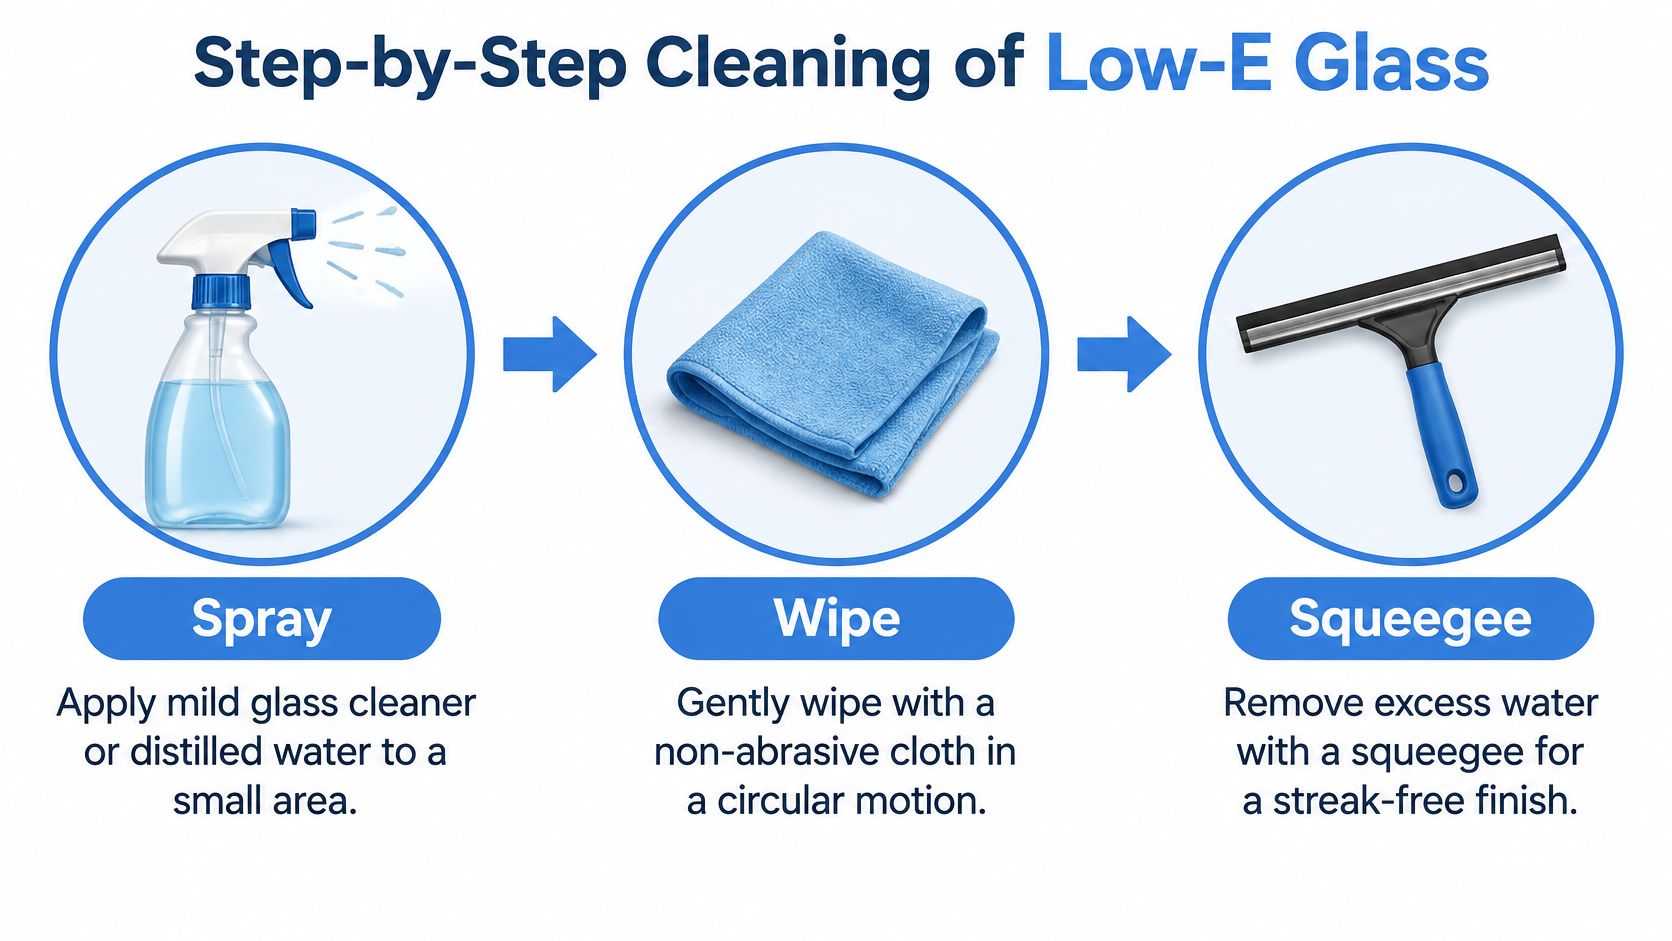
Rinse the loose dust off with a gentle stream of water, top to bottom. Dry grit is what scratches. Once it's suspended, it can be carried away rather than ground in.
Flood the surface with mild detergent solution, sprayed on or pressed against the glass with a saturated cloth. Manufacturer guidance for pyrolytic low-E calls for exactly this, enough liquid to lift grit before any rubbing begins.
Work the wet dirt with a clean, lint-free cloth in light, straight strokes, turning or rinsing the cloth often. Straight strokes make any scratch that does happen easy to spot and easy to stop.
Keep the whole pane wet until you're ready to dry it. Scrubbing dry or partly wet coated glass is the single slip that causes most damage. If a section starts to dry, rewet it before the cloth touches it again.
Rinse with clean water, deionized for the final pass. Where a maker specifies heated water, the figures run to clean water at 50 to 60°C (120 to 140°F) with a commercial glass-washing detergent, then a final rinse of deionized water heated to at least 43°C (110°F), as set out in the same NGA architectural-glass guidance. For most residential panes, lukewarm water does the same job.
Dry immediately with a second clean, lint-free cloth or a soft squeegee, working top to bottom and overlapping each pass. Water left to evaporate is where spots and streaks come from.
Inspect at an angle in daylight, not straight on. Haze, a rainbow sheen, or a set of parallel fine scratches means stop and reassess before the next pane.
A good result looks like nothing at all: no film in angled light, no streaks against the sky, and no difference in sheen between the cleaned pane and its neighbor.
A streak that shows once the pane looks dry is usually detergent or minerals that evaporated in place. Harder scrubbing only moves that film. Identify the coated face first, then run one short sequence on that pane, and judge the same bottle against that coating before you touch the next one.
Rinse with clean water and dry with a fresh lint-free cloth. The streak often leaves with the rinse. If one spot stays, stop wiping it.
For isolated residue, Pilkington Eclipse Advantage coated-glass guidance recommends dabbing or blotting rather than wiping, which limits sideways movement of particles across the coating. The same guidance sets the water quality bar for coated systems at clean deionized water below 30 μS conductivity and a roughly neutral pH of 7 ± 1, and limits machine-brush bristle diameter to about 0.15 to 0.20 mm where a brush is used at all (Pilkington Eclipse Advantage coated-glass guidance).
On heavily soiled glass or post-construction deposits, the order matters more than the product. Start with a test area, plenty of neutral-to-mild detergent solution, a soft non-abrasive cloth or pad, a thorough rinse, and immediate drying. Move up in strength only after that test area comes clean. If the glass maker's instructions forbid the next product, those instructions decide.
Low-E symptoms, causes and fixes
| Symptom | Likely cause | Fix |
|---|---|---|
| Streaks or film after drying | Ammonia or alcohol cleaner, or leftover detergent | Rinse with deionized water and dry with a fresh lint-free cloth |
| Hazy or rainbow sheen | Residue, hard-water film or mineral deposit | Test a small area with mild detergent; stop if the haze stays |
| Fine scratches in one direction | Grit dragged across dry glass or a dirty squeegee | Stop, keep the surface wet, replace cloths and get a manufacturer opinion |
| Metal transfer marks | Steel wool, razor blade or metal squeegee channel | Stop and call a professional for assessment |
| Dried dirt that will not lift | Mineral or dried deposit | Dab with solution, rewet and repeat in a test area; never scrub |
| Paint, mortar or silicone spots | Construction residue | Get written manufacturer approval before any removal |
Photograph the pane before and after. A coating problem and a cleaning problem look the same until the two photos sit side by side. I stop work on that pane as soon as haze, iridescence, or directional scratching appears. Metal transfer marks are the clearest signal: a metal tool has already touched the coating, and no cloth will undo it.
Firm rule: paint, mortar, silicone, and hard-water scale removal on coated glass needs written manufacturer approval before anyone touches the pane.
A dusty pane needs a different first move from a cold one. Dust calls for a rinse before contact; cold calls for checking the glass temperature and choosing a milder part of the day. The coating still sets the cleaning rules, but local conditions affect how quickly dirt lifts and solution dries.
Phoenix and Scottsdale: Airborne dust and hard-water spots can build up on exterior glass. Start with a gentle rinse to lift loose grit, then use the full wet-cleaning method. A deionized final rinse can help where hard water leaves spots. Professional Window Cleaning's Phoenix window cleaning and Scottsdale window cleaning services include exterior glass cleaning.
Las Vegas: Dust and fast drying make timing important. Work in shade, clean smaller sections, and keep each area wet until it is ready to dry. Professional Window Cleaning offers Las Vegas window cleaning.
Denver: On cold days, wait for a mild afternoon and make sure the glass is above freezing before cleaning. Avoid direct hot sun, which can dry solution before you finish the pane. Professional Window Cleaning offers Denver window cleaning.
Pilkington's washing guidance explains that airborne mineral particles can remain on exterior glass in dusty markets. That is why a pre-rinse matters: it lifts loose particles before a cloth or brush moves across the coating (Pilkington pyrolytic low-E washing bulletin).
At height, use a soft brush or pad on an extension pole and keep metal ends away from the glass. Work only from a position that allows safe control of the tool; a longer reach does not justify leaning past a secure stance. For construction or renovation residue such as paint, mortar, or silicone, follow the manufacturer's approval requirements before attempting removal.
Clean interior glass when it is visibly dirty, and schedule exterior cleaning more often where dust accumulates. After a dust storm, rinse exterior glass to remove loose grit before it dries in place.
A pane you can reach from a stable ladder, with a coating you can name from the label or the installer's paperwork, is a fair DIY job if the glass is sound and the dirt is ordinary film. Hire when the windows are high-rise or awkward to reach, when you cannot identify the coating across many panes, when you see scratches, haze, or metal transfer, or when paint, mortar, or silicone from construction is still on the glass. A wrong cleaner on the wrong coating is what marks low-E.
I would decide it that way. Name the coating first, then run one step sequence for that coating, pane by pane. The same bottle is not automatically safe on the next window.
A squeegee or a pure-water rinse both need the same restraint on coated glass: soft contact, clean rinse water, and no abrasive pad. The tool matters less than matching those steps to the coating you already identified. Professional Window Cleaning, in business since 1999, washes residential, commercial, and high-rise glass in Arizona, Colorado, and Nevada (Professional Window Cleaning company profile). Crews use soft brushes and microfiber cloths on every inch of sills and frames so the trim comes clean without scarring the glass or the surrounding areas. Residential window cleaning takes the job past the pane to frames, sills, and tracks, which is the part many DIY jobs skip once the glass looks clear.
Three next actions, in this order:
If that test patch means working from a ladder you do not trust, leave the pane to a crew. Visit Professional Window Cleaning to book a visit or request a quote.
Read our blog posts regularly and keep learning.