
Care and Maintenance
Commercial Window Cleaning Tips: 6 Pro Methods
Use these commercial window cleaning tips to plan safer schedules, choose squeegee or pure-water methods, prevent spots, and control costs.


You've probably opened a casement window to clean the glass and found that the job quickly becomes more awkward than expected. The crank sits in the lower corner, the screen won't come out from the outside, and dirt has collected along the frame, hinge, and drainage openings. A quick spray on the pane may improve the view, but it won't address the parts that keep the sash operating properly.
Casement windows have been used for centuries. Documented glazed examples appeared in England and France in the 15th century, and traditional timber casements were the most common window type in Britain by the second half of the 18th century. Their long history explains why a modern home may still contain divided lights, lead cames, old timber, or hardware that needs a gentler approach. The history of casement windows helps explain why casement window cleaning is as much about careful access and maintenance as it is about making glass shine.
A homeowner usually notices the problem at the first lower corner. The glass looks clean in the middle, but a dark line remains around the edge, the crank feels rough, and dirty water has collected on the sill. With a sliding window, the sash moves within the frame. With a casement, the sash swings outward on side hinges, bringing the exterior pane toward you while exposing the operator, stays, seals, and hinge hardware.
That outward movement creates useful access, but it also changes the order of work. The screen generally comes out from inside, the opening must remain stable while you reach through it, and the lower rail can hold grit against the weather seal. A generic spray-and-wipe routine often pushes liquid and debris toward the very parts that need protection.
Older casements may have small panes, glazing bars, and lead cames. Newer designs often use larger sheets of glass, but they still include hinges, crank mechanisms, drainage slots, and perimeter seals. Later advances in glassmaking reduced some casement divisions from six panes per window to two, creating different cleaning demands across older and newer buildings. The evolution of casement windows shows why a technician needs to adapt the method to the window's construction rather than assume every casement is a flat pane.
Practical rule: If you clean only the center of the glass, you've cleaned the most visible part, not necessarily the most important part.
Casements do have a structural advantage. Many can open outward, and some designs rotate up to 90 degrees, making both faces reachable from indoors. That can eliminate the need to work from a ladder for reachable windows, but it doesn't make an opening safe to lean through. Falls remain a major share of window-cleaning accidents, commonly caused by over-reaching or losing balance while accessing the exterior face, as explained in Scottish building safety guidance.
For a reliable result, treat the pane, frame, drainage, hardware, and seal as one system. The casement-style window guide from Professional Window Cleaning is a useful reference for understanding that design before you begin.
Set up indoors before touching the glass. You'll need a small bucket, a spray bottle containing warm water with a few drops of dish soap, two lint-free microfiber cloths, and a squeegee with a clean rubber blade. Add a soft-bristle brush or old toothbrush, a vacuum with a brush attachment, and 100% silicone spray lubricant for the moving hardware.
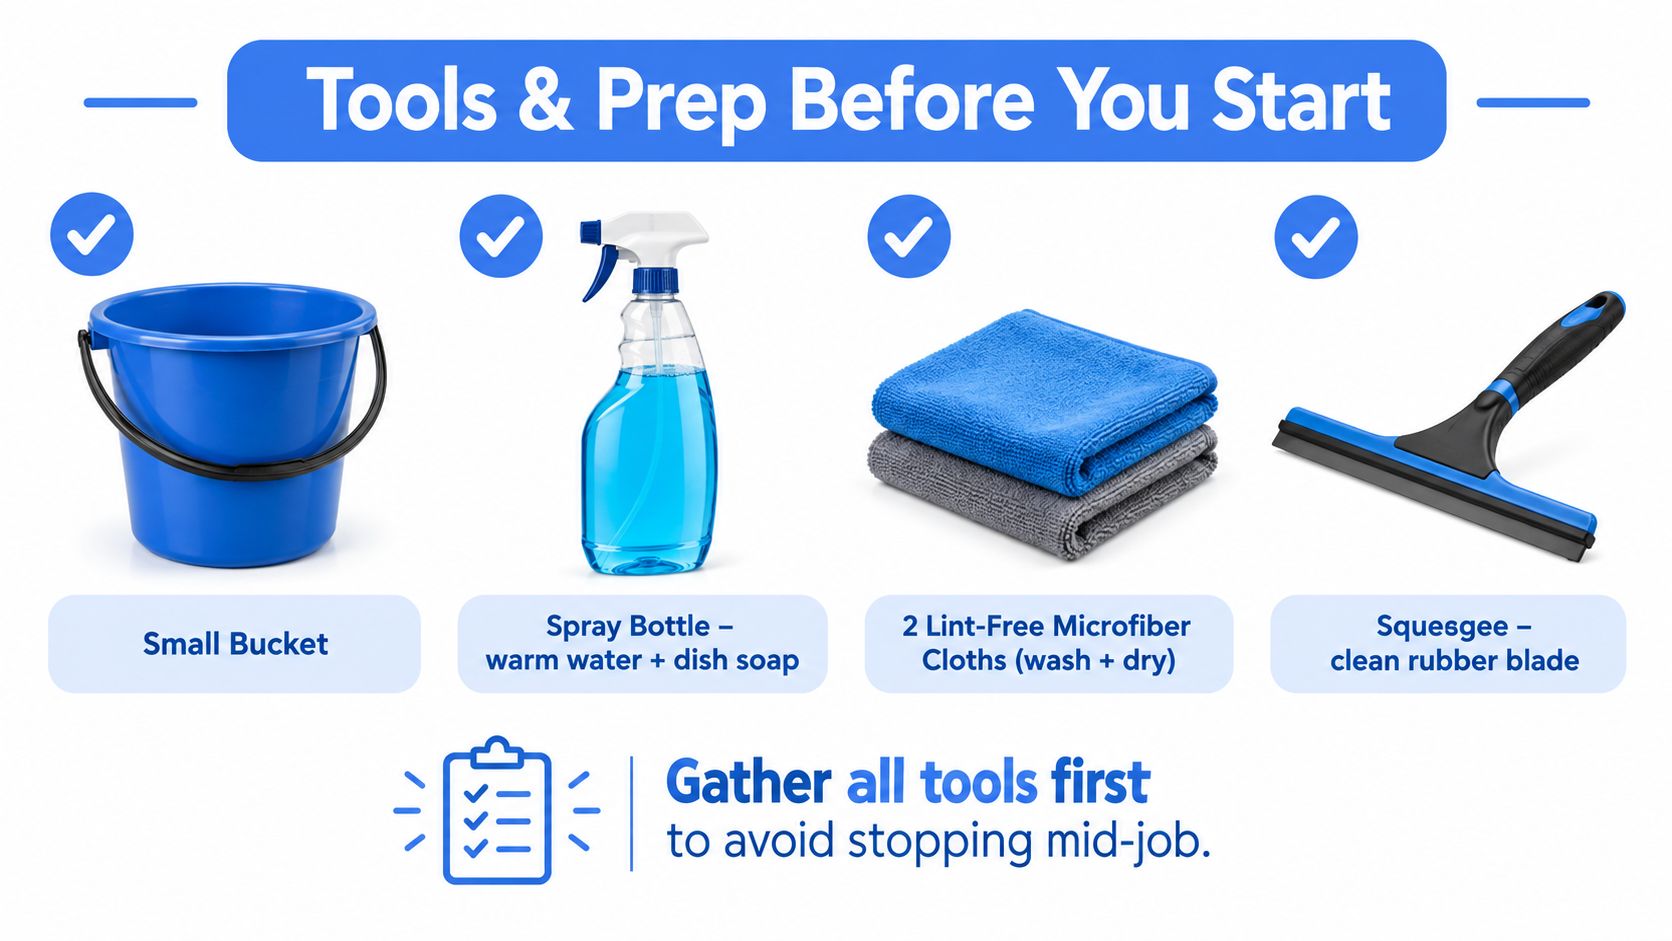
Place a towel beneath the window to catch drips. Move blinds, curtains, and nearby objects out of the way so you can control the sash without snagging fabric or knocking something onto the sill. If the screen blocks the crank or hinge side, remove it from inside and set it on a clean, protected surface.
Vacuum the sill and frame before applying liquid. Loose grit can scratch glass when it gets trapped beneath a cloth, and dust mixed with cleaner becomes a muddy residue that spreads along the gasket. Manufacturer safety guidance for casement cleaning supports starting with dry debris removal and using soft, non-abrasive materials, mild cleaner, and low-pressure rinsing.
Check that the sash opens and closes smoothly. Don't force a stiff crank or hinge while holding cleaning tools. If the window binds, stop and identify whether debris, a damaged seal, or a hardware fault is responsible. Choose a day when the glass won't dry immediately in strong direct sunlight, and keep every tool together on one tray so you don't have to leave an open sash unattended.
Start with the interior pane while the sash is closed. This gives you a stable surface and lets you clean the room-facing side without reaching through the opening. It also keeps the exterior work from carrying fresh outdoor grit across a pane you've just finished.
Use the spray bottle lightly. Casement gaskets and frame joints can collect excess liquid, which may run down onto the sill or toward the operator. Apply enough solution to loosen the film, not enough to soak the edge.
Work from the top downward with a lint-free microfiber cloth. Straight, overlapping strokes help lift dust and oily residue, while frequent cloth turns keep collected grit away from the glass. For heavily soiled panes, make a first pass with the mild soapy solution, then use a clean, damp section of cloth to remove remaining residue.
A squeegee gives the cleanest controlled finish when its rubber is in good condition. Pull it downward in vertical passes, overlapping slightly, and wipe the blade after every stroke. A nicked or dirty blade leaves lines no matter how carefully you work.
Pay special attention to the lower corners. The crank arm or operator often occupies that area, so solution can pool along the frame and harden into a dull film. Use the soft brush around the corner rather than pushing a cloth aggressively into the mechanism.
Clean-glass habit: Keep one cloth for washing and another for drying. Mixing those jobs transfers moisture and grit back onto finished edges.
Dry the perimeter of the glass, frame edges, sill, and visible operator with the second microfiber. The casement should be dry enough that opening it won't send moisture along the sash edge. Don't use abrasive pads, razor blades, or harsh solvents on painted frames, seals, screens, or historic glazing components.
Once the inside is dry, remove the screen from indoors if it remains installed. Set it aside carefully, and mark one corner with a small piece of tape if its orientation isn't obvious. Screens can fit unevenly when rotated, and forcing one back into the frame can bend the mesh or clips.
Disengage the lock and operate the crank as designed. Open the sash only to the manufacturer-approved limit, commonly around 90 degrees, and check that the limit arm or hinge restrictor is holding the window steady. Never use the open sash as a handhold, and don't lean your body through an opening.
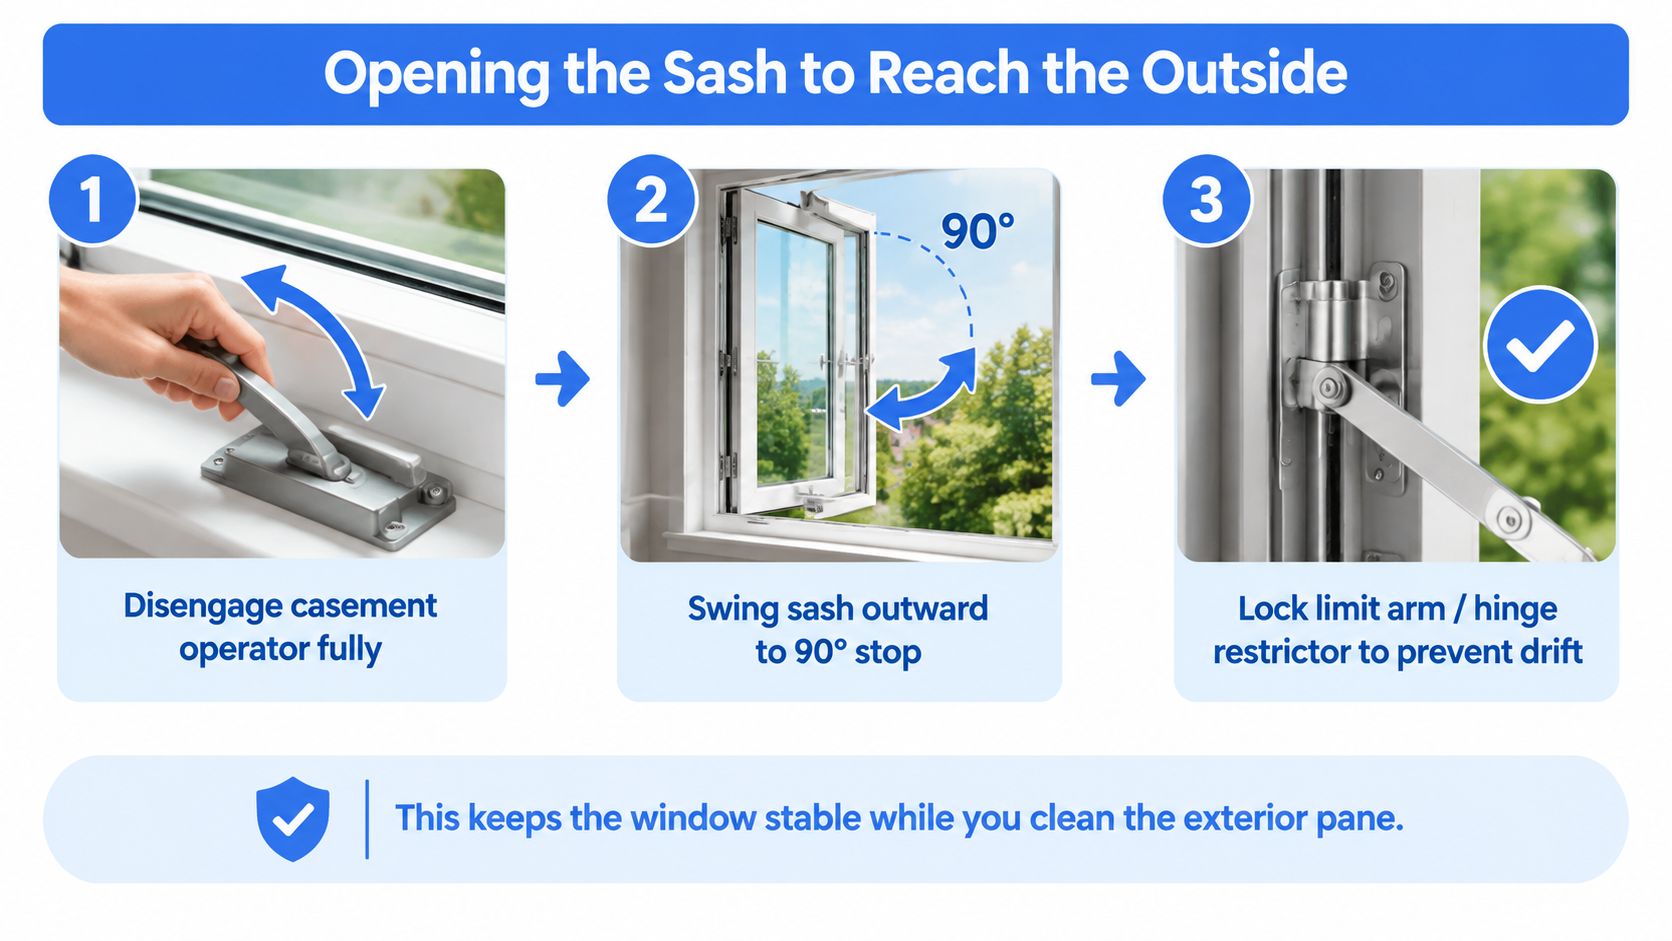
Mist the exterior glass with the same mild solution used indoors. Start at the upper corner and pull the squeegee down in overlapping strokes, wiping the rubber between passes. If the pane has small divided lights, clean each section deliberately and use a narrow microfiber fold for the corners rather than forcing the squeegee across glazing bars.
Before opening the sash, protect the hinge-side hardware from runoff by keeping the spray away from the edge. The crank arm and hinge can be exposed to liquid that travels along the sash, so edge control matters more here than on a fixed pane. A soft cloth with light moisture is safer than flooding the frame.
For a second-story window, use a stable step stool only where the footing is secure and the reach remains comfortable. Don't place a ladder against the open sash, and don't stretch sideways to chase the last corner. If the exterior face can't be reached while you remain balanced inside, the job has moved beyond sensible DIY access.
After the glass is clear, wipe the outer sill lip, frame edge, and weatherstripping area. Grit often collects where the seal meets the sill. Dry everything before reinstalling the screen, and confirm the screen sits evenly without pressing against the gasket.
Casement window cleaning should include hardware while the area is already open. Once the glass and frame are dry, use the vacuum's brush attachment on hinge tracks, operator channels, and exposed pivot areas. The brush loosens grit without scraping painted finishes.
Wipe the operator arm, hinge surfaces, handle, and pivot points with a barely damp microfiber. Dry them immediately. Apply a light amount of silicone-based lubricant to the moving joints after cleaning, then operate the sash several times to distribute it. Avoid abrasive, solvent-based, or bleaching cleaners, and don't substitute petroleum grease where it can collect dust or affect weatherstripping.
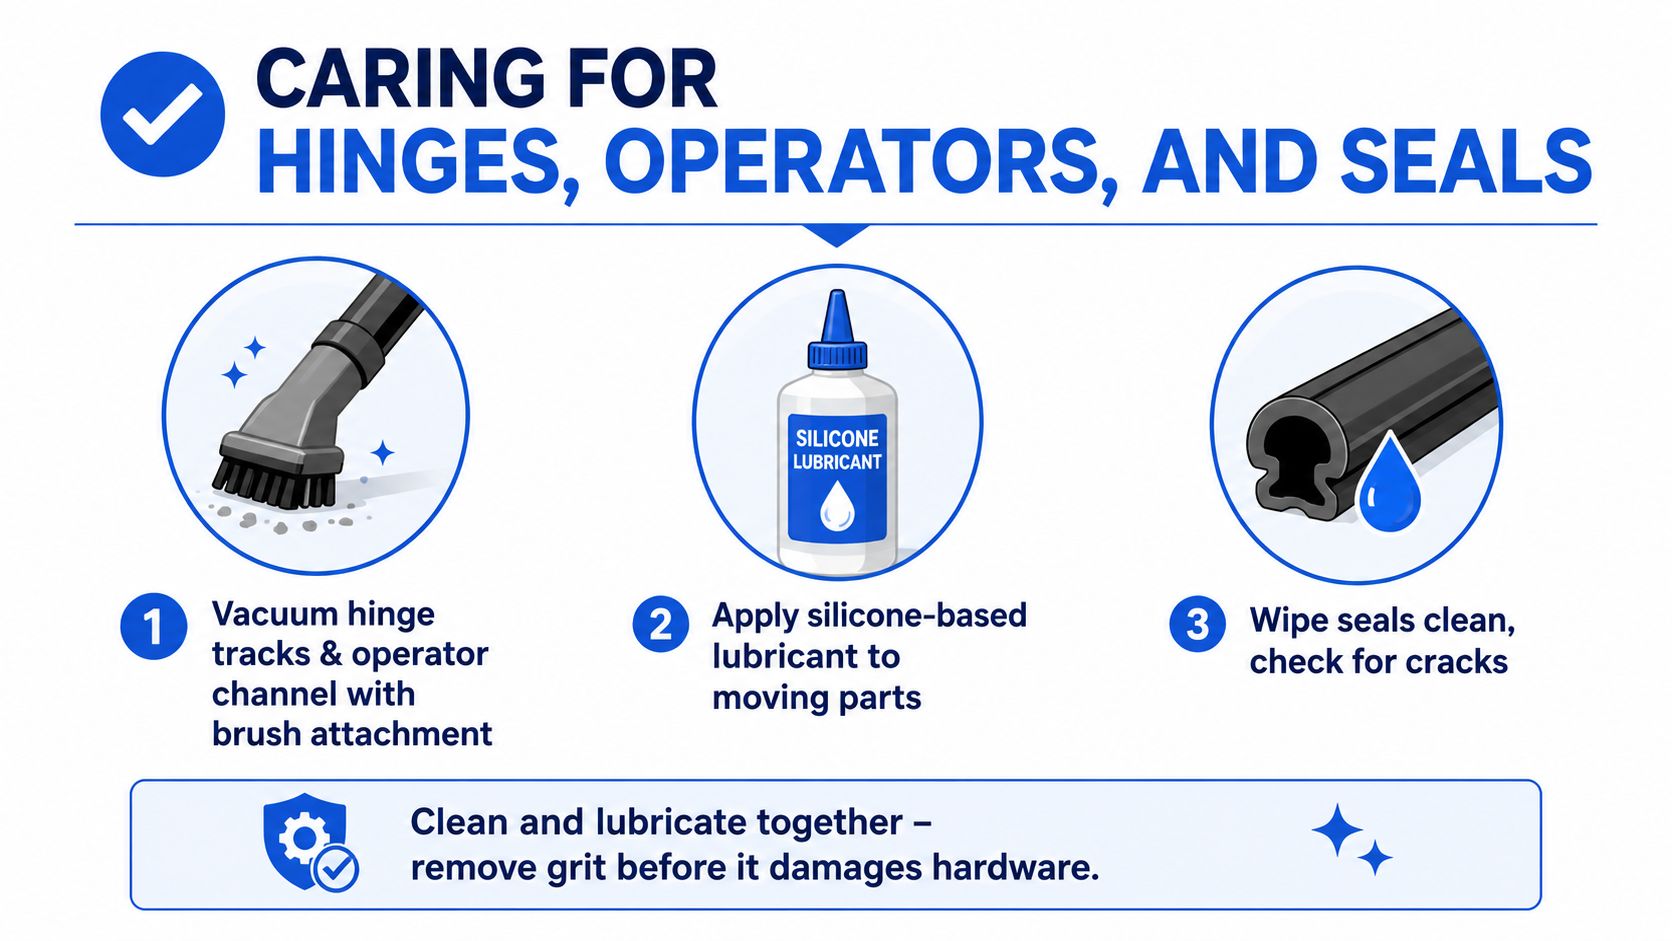
Inspect the perimeter gasket for gaps, flattening, or tears. Look at the drainage openings along the sill and clear visible blockage carefully with a wooden toothpick or another non-metal tool. Don't drive debris deeper into the opening, and don't drill or enlarge a drainage hole.
A maintenance guide for casement windows recommends cleaning glass and frames on a recurring cycle of about every four months, with visible hinges cleaned annually and silicone-based lubrication used after cleaning. The casement maintenance guide connects this routine with smoother operation, reduced obstruction, and better long-term care.
For detailed seal care, use the guide to cleaning window seals as a companion reference. If the crank remains stiff after debris removal and lubrication, stop forcing it. A bent operator arm, corroded hinge, or damaged seal needs assessment rather than extra pressure.
A ground-floor casement is often manageable for a careful homeowner. The DIY approach gives you close control over delicate screens, divided lights, timber frames, and hardware, and you can inspect small problems as you work. It also demands patience, because the finished result depends on dry edges, clean rubber, and restrained use of liquid.
Professional service becomes more useful when height, access, or glass condition changes the risk. There are only two methods professional window cleaners use, a traditional squeegee method and a pure-water system. A squeegee provides a controlled hand finish and works well for interior casements and tight spaces. A pure-water system uses treated water with water-fed equipment, which can reach high exterior glass from the ground in suitable conditions.
Hard-water marks, fragile historic materials, stiff operators, and restricted openings all favor a measured assessment before cleaning. A professional shouldn't force a crank or use a harsh tool to remove a stubborn mark. The right choice depends on access, the condition of the glass, and whether the hardware can remain protected while the exterior is reached.
| Method | Best For | Limits | Typical Cost |
|---|---|---|---|
| DIY squeegee and mild solution | Reachable ground-floor glass and routine frame care | Requires time, safe access, and careful hardware handling | Varies by household supplies |
| Professional squeegee service | Interior casements, divided lights, and tight access | Requires an appointment and clear working area | Varies by property and scope |
| Professional pure-water system | Suitable elevated exterior glass reached from the ground | Not ideal for every interior pane, screen, or delicate hardware detail | Varies by property and access |
Property managers can also keep service records alongside maintenance notes. A simple invoice for house cleaners can help document the date, scope, and condition observed after a routine, especially when several properties or recurring visits are involved.
A practical schedule is to inspect the glass and frames regularly, clean drainage and hardware whenever visible debris appears, and give the hinges a dedicated annual check. Professional Window Cleaning has operated since 1999, meaning it has been in business for more than 26 years as of September 2026. The company provides residential, commercial, and high-rise window cleaning, using squeegee or pure-water methods according to the building and access conditions.
Professional Window Cleaning serves Las Vegas, Phoenix, Denver, Scottsdale, Tempe, Chandler, Gilbert, and Flagstaff, so homeowners and property managers in those locations can choose a service based on safe access and casement hardware needs rather than treating every window as a standard pane.
If your casement windows are difficult to reach, marked by hard-water buildup, or showing stiff hinges and operators, contact Professional Window Cleaning for a service plan built around the glass, access, and hardware. Ask the technician to include frames, drainage openings, seals, and moving parts in the visit, not just the visible pane.
Read our blog posts regularly and keep learning.