Care and Maintenance
How to Clean Double Glass Windows Safely
Learn how to clean double glass windows without damaging seals. Two professional methods, step-by-step instructions, and seal care tips included.


You've wiped the shutters in the sunroom, but the gray film is still there. Dust has settled along the louver edges, collected around the hinges, and worked into the frame where a quick pass with a damp cloth can't reach. After a windy week in Phoenix or Las Vegas, those shutters can act like a quiet dust reservoir, especially when a feather duster just sends particles back into the room.
I've spent more than 26 years cleaning windows, and shutters need to be treated as part of the complete window system, not as decoration separate from the glass. The reliable approach is simple: remove loose contamination while everything is dry, then use only the amount of moisture the material can safely tolerate.
Plantation shutters catch dust in places homeowners rarely inspect. The broad faces of the louvers are obvious, but the edges, hinges, tilt bars, frame corners, and gaps beside the window collect the material that a fast wipe leaves behind. Sunlight makes the problem easier to see. A shutter may look clean from across the room while a close inspection reveals a dull coating along every slat.
That buildup matters for appearance, but it also affects what happens indoors. Dry dust can become airborne when you open the louvers, brush across them, or wipe with a cloth that has too much static. In dry climates such as Phoenix and Las Vegas, frequent wind and low humidity make that resuspension problem especially noticeable. The right question isn't only how to clean shutters until they look brighter. It's how to remove the dirt without redistributing it.
Practical rule: Dust first, introduce moisture second.
The safest starting tools are a clean microfiber cloth, a feather duster, or a vacuum fitted with a soft brush attachment. These tools remove loose dirt while reducing the risk of scratching the slats, and they can reach both faces and the crevices where grime hides, as outlined in this shutter maintenance tool guide.
A damp cloth can turn loose grit into a thin paste. That paste travels along the finish, gathers at the louver joints, and leaves the gray haze many homeowners mistake for permanent discoloration. If the cloth is overloaded with water, it can also push residue into hinges and frame seams.
The rest of the job follows a two-track method. First, clear the dust mechanically. Then, choose a barely damp cloth or mild soap solution based on whether the shutter is wood, vinyl, composite, or another finish. This sequence protects the surface and gives you a better chance of finding the actual stain rather than polishing loose dirt into it.
A dependable interior workflow uses two dry passes. Close the louvers first, remove dust from the exposed face, then open them fully and repeat on the opposite face. This exposes hinge-side crevices and narrow areas hidden when the slats are closed. The method is detailed in this plantation shutter cleaning guide.
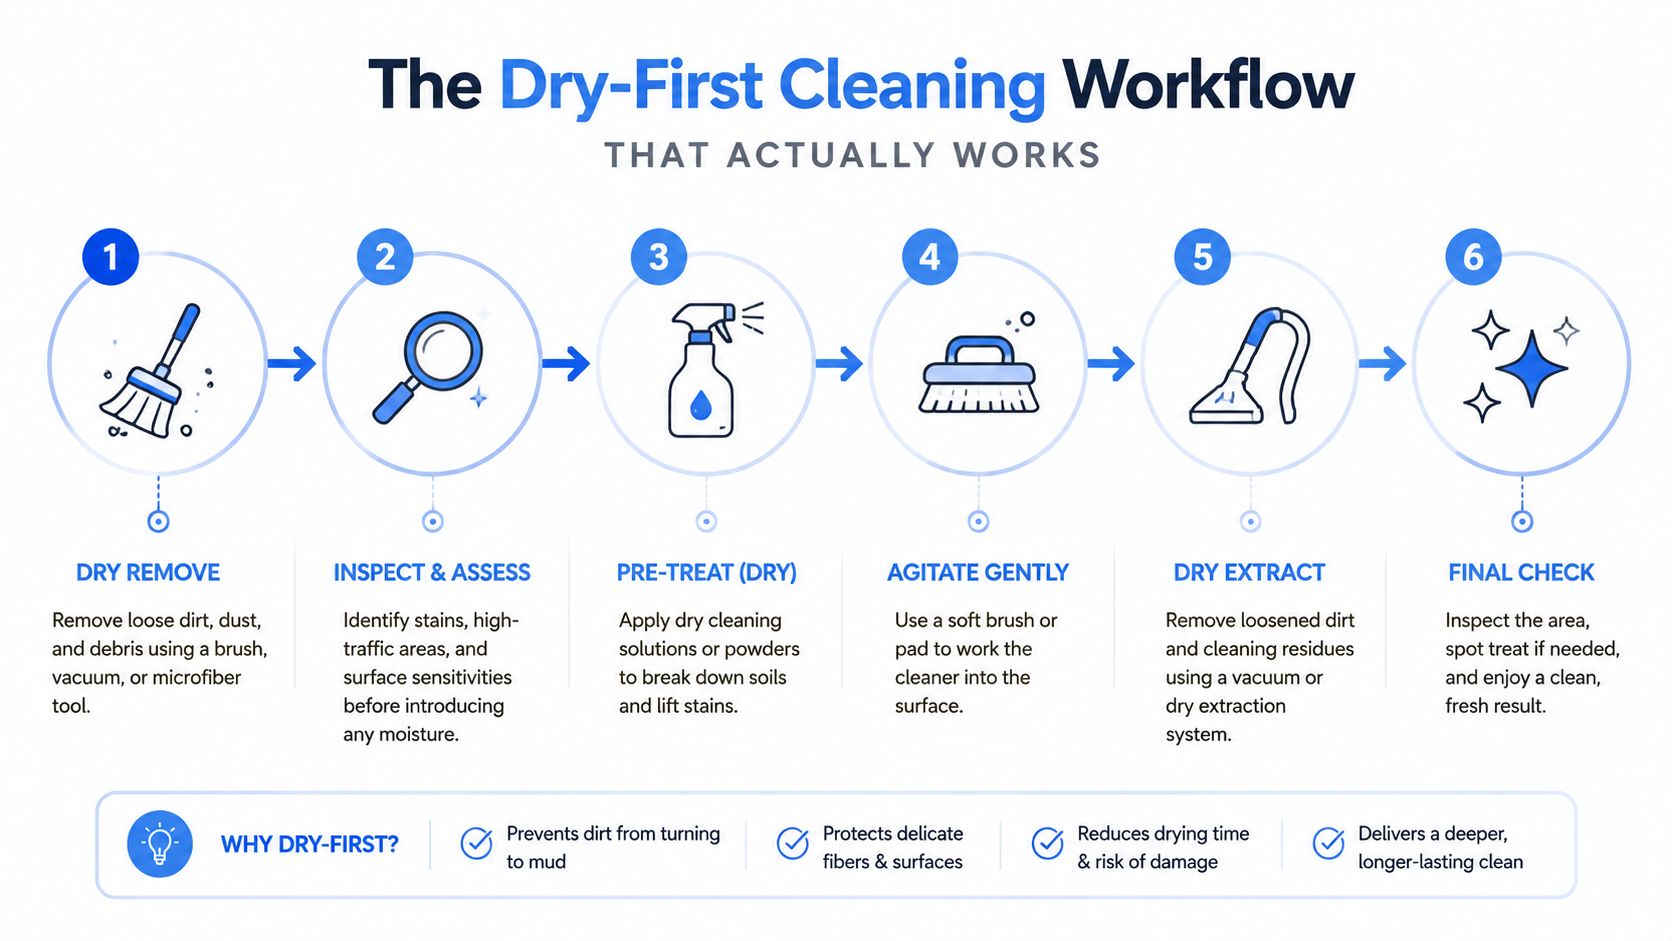
Set the vacuum to a gentle setting and fit a soft brush attachment. A floor head or hard plastic nozzle can scratch a finished louver. Begin at the top and work downward, allowing loosened particles to fall onto areas you have not cleaned.
Keep the brush against the surface without pressing hard. On particularly dusty sets, hold the vacuum nozzle close to the brush so it captures what the bristles release, especially in dry homes in Scottsdale or Denver where static keeps fine dust clinging to the finish.
Some manufacturer guidance also suggests a dryer-sheet swipe to reduce static cling. Use it only as a light finishing pass after dust removal. A dryer sheet will not remove embedded grime or replace the two-pass process, and it can leave residue if rubbed aggressively.
A dedicated soft brush attachment, several clean microfiber cloths, and a small soft-bristled brush for tight corners handle most interior dust. Keep separate cloths for dry removal and damp wiping. This prevents loosened residue from returning to freshly cleaned surfaces. Stop and change cloths once one becomes visibly dirty.
The safest cleaner depends on what the shutter is made from, not on how dirty it looks. Wood needs restraint, while vinyl and composite finishes generally tolerate more moisture. If you aren't sure which material you have, check the installation paperwork or test any method in an inconspicuous corner first.
Wood shutters should receive only a lightly damp cloth, followed by immediate drying. Don't soak the cloth, spray the shutter directly, or leave moisture sitting on a louver. Outdoor and vinyl surfaces can generally tolerate hose rinsing and mild soap more readily, which is why generic advice often fails to answer the practical question, “What is safe for my shutter material?” The material distinction is covered in this shutter care and avoidance guide.
| Material | Safe Cleaner | Water Level | Drying Required |
|---|---|---|---|
| Wood | Dry microfiber first, then a lightly damp cloth | Minimal moisture | Yes, immediately |
| Vinyl | Mild soap or mild detergent mixed with water | Moderate, controlled moisture | Yes, to prevent residue and spots |
| Composite | Mild soap or mild detergent mixed with water | Moderate, controlled moisture | Yes, especially around joints |
| Aluminum | Dry microfiber first, then a mild compatible cleaner if needed | Light to moderate, without flooding moving parts | Yes, after rinsing or wiping |
For painted or stained wood, dampen the cloth and wring it out thoroughly. Wipe one louver at a time, then follow with a dry cloth before moving on. If a mark remains, don't escalate immediately to a stronger chemical. Persistent discoloration may indicate finish wear, staining, or residue from an earlier cleaning.
A mild soap solution is the practical choice for routine grime on vinyl or composite shutters. Apply it to the cloth rather than flooding the shutter, wipe from the top down, then use a clean damp cloth to remove soap. Dry the louvers, frame, and joints so residue doesn't remain where dust can grab it.
For every material, remove ammonia, abrasive pads, and harsh multipurpose sprays from the process. They can damage finishes, encourage residue buildup, and contribute to warping when paired with excess water. The embedded video below demonstrates the kind of controlled, material-aware technique worth following.
Exterior shutters change the job because water runoff, overspray, and working position become part of the risk. Ground-level shutters are usually manageable when you can stand securely, keep both feet on the surface, and control the hose without reaching. Second-story shutters are different. If you're stretching sideways, standing on an unstable surface, or trying to hold a bucket while climbing, the task has already outgrown a casual DIY routine.
Before cleaning, protect nearby walls, plants, and open windows. Close the shutter if that keeps water from entering the room, and check the surface for loose paint, cracked material, or damaged joints. Never use water pressure to compensate for poor access.

For an accessible exterior shutter, use a gentle sequence:
Those process controls prevent you from grinding grit into the finish or leaving detergent marks in the louvers. Use a soft brush where needed, but don't attack a delicate surface with a stiff bristle or abrasive pad.
A ladder needs firm, level footing and a position that lets you work without leaning away from it. A spotter is sensible when the setup is difficult, the ground is uneven, or the work area has foot traffic. If the shutter is above a conservatory, over a stairwell, beside a sloped roof, or beyond comfortable reach, put the ladder away. A professional 16-foot ladder safety resource can help explain why access planning matters, but it doesn't make an unsafe position safe.
A shutter stain is often a cleaning problem before it's a product problem. Hard-water marks leave mineral spotting, kitchen air deposits an oily film, bathroom moisture can support mildew, and frequently touched louvers collect skin oils. Gray haze commonly comes from a mixture of dust and cleaner residue that has been spread repeatedly rather than removed.
Start by identifying the surface and the likely source. A mineral mark on vinyl isn't treated the same way as grease on painted wood, and neither should be attacked with the strongest bottle under the sink.
For light mineral spotting, a carefully diluted vinegar solution may help on a compatible non-wood surface. Apply it to a cloth, not directly into joints, work a small area, and rinse or wipe afterward. Test first, because acid can affect sensitive finishes and should not be treated as a universal shutter cleaner.
Greasy kitchen residue needs a mild soap solution and patience. Wipe in small sections, change to a clean cloth as soon as the first one becomes dirty, then remove the soap with a separate damp cloth. A small baking-soda paste can help with stubborn grease on a durable, compatible surface, but don't scrub aggressively and don't use it on delicate wood without confirming the finish can tolerate it.
The strongest cleaner is often the wrong cleaner.
Mildew requires more caution. If the growth is widespread, returns quickly, or appears around damaged material, cleaning alone may not solve the moisture source. Improve ventilation, inspect seals and surrounding areas, and seek professional advice when the shutter finish is soft, peeling, or visibly deteriorated.
Avoid ammonia, abrasive pads, harsh chemicals, and excess water. These are repeatedly associated with finish damage, warping, and residue buildup, as explained in this guidance on phosphoric acid cleaner considerations. Specialized acid products may be appropriate for certain exterior mineral deposits in professional hands, but they aren't a sensible default for interior shutters.
If a clean cloth leaves a dull streak, the answer is usually better rinsing and drying, not a stronger chemical. Work slowly, use less product, and inspect the louver edges where residue tends to collect.
A workable schedule starts with light dust removal weekly or bi-weekly, followed by a deeper clean every 3 to 6 months for plantation-style shutters. Some maintenance guidance also recommends quarterly visual checks and an annual professional service, particularly when grime can accumulate around louvers, frames, and moving parts. See this practical shutter maintenance schedule for the full benchmark.
Your environment should change the rhythm. Coastal or very dusty homes may need cleaning every 1 to 2 weeks near the shore, while homes farther inland can often extend the interval to 2 to 4 weeks or longer, depending on visible buildup. One coastal maintenance guide connects accelerated salt and sand exposure with homes roughly 164 feet to 3 miles from the shoreline, as described in this coastal shutter maintenance checklist.
Small habits reduce the work. Vacuum the sill before cleaning the shutter, keep windows closed during especially windy periods, and inspect the finish for cracks or peeling while the louvers are open. A short, consistent dry pass is easier on the material than waiting until every joint holds visible grime.
DIY cleaning makes sense for reachable interior shutters and sound, ground-level exterior surfaces. Call for help when the work involves multi-story access, fragile or antique wood, post-construction dust, damaged finishes, or a ladder position that forces you to reach and twist. Time matters too. If the job keeps getting postponed, the buildup becomes harder to remove and the surrounding glass and frames remain unfinished.
For window cleaning, professionals use only two methods, a squeegee or a pure-water system. The same disciplined approach applies around shutters: remove contamination methodically, control moisture, work from the top down, and leave no residue behind. Professional Window Cleaning has been cleaning windows for over 26 years, serving homeowners and properties in Phoenix, Las Vegas, Denver, and Scottsdale.

If your shutters need careful cleaning alongside the glass, frames, and hard-to-reach windows, visit Professional Window Cleaning to arrange a complete service. Give the team the shutter material, access details, and the kind of buildup you're seeing so they can recommend the safest way to restore the whole window area.
Read our blog posts regularly and keep learning.