Care and Maintenance
Rubber for Squeegees: Materials, Hardness, and Fit
Choose the right rubber for squeegees with our pro reference on materials, durometer hardness, widths, compatibility, replacement, and care.


The popular advice is to find the right window cleaner for tinted windows. That's only half the job. A compatible product can still cause trouble if you use it before the film has cured, wipe grit across the surface, flood the edges, or clean hot glass in direct sunlight.
Tinted glass is a film system bonded to glass, not ordinary glass with a dark coating mixed into the surface. The cleaner matters, but timing and technique usually decide whether the film stays clear, flat, and firmly attached. After more than 26 years in professional window cleaning, the mistakes I see most often aren't caused by a lack of expensive products. They come from rushed first cleaning, contaminated cloths, excessive pressure, and ammonia-based formulas.
Professional Window Cleaning has served residential, commercial, and high-rise properties since 1999, including homes and businesses in Las Vegas, Phoenix, Denver, Scottsdale, Tempe, Chandler, Gilbert, and Flagstaff. The same disciplined approach applies whether the film is on a car door, a home window, or a commercial façade.
The cleaner is rarely the first thing that damages tinted glass. Timing and technique usually create the bigger risk. Cleaning before new film has cured, dragging grit across the surface, flooding the edges, or working on hot glass in direct sun can harm tint even when the product is approved.
“Just use Windex” is an unreliable shortcut. Ammonia can damage some films, and ordinary glass-care habits, including blades, rough sponges, and forceful scrubbing, can scratch or lift the film.
Manufacturers recommend a gentler process. 3M's film-care guidance advises against knives, scrapers, brushes, and abrasive materials. It lists Windex Original Glass Cleaner and diluted isopropyl alcohol as suitable options, followed by a soft squeegee to remove moisture. LLumar similarly recommends liquid glass cleaners, a soft rubber squeegee or microfiber cloth, and a mild alcohol-and-detergent mixture, while warning against razor blades, scrapers, and abrasive compounds.
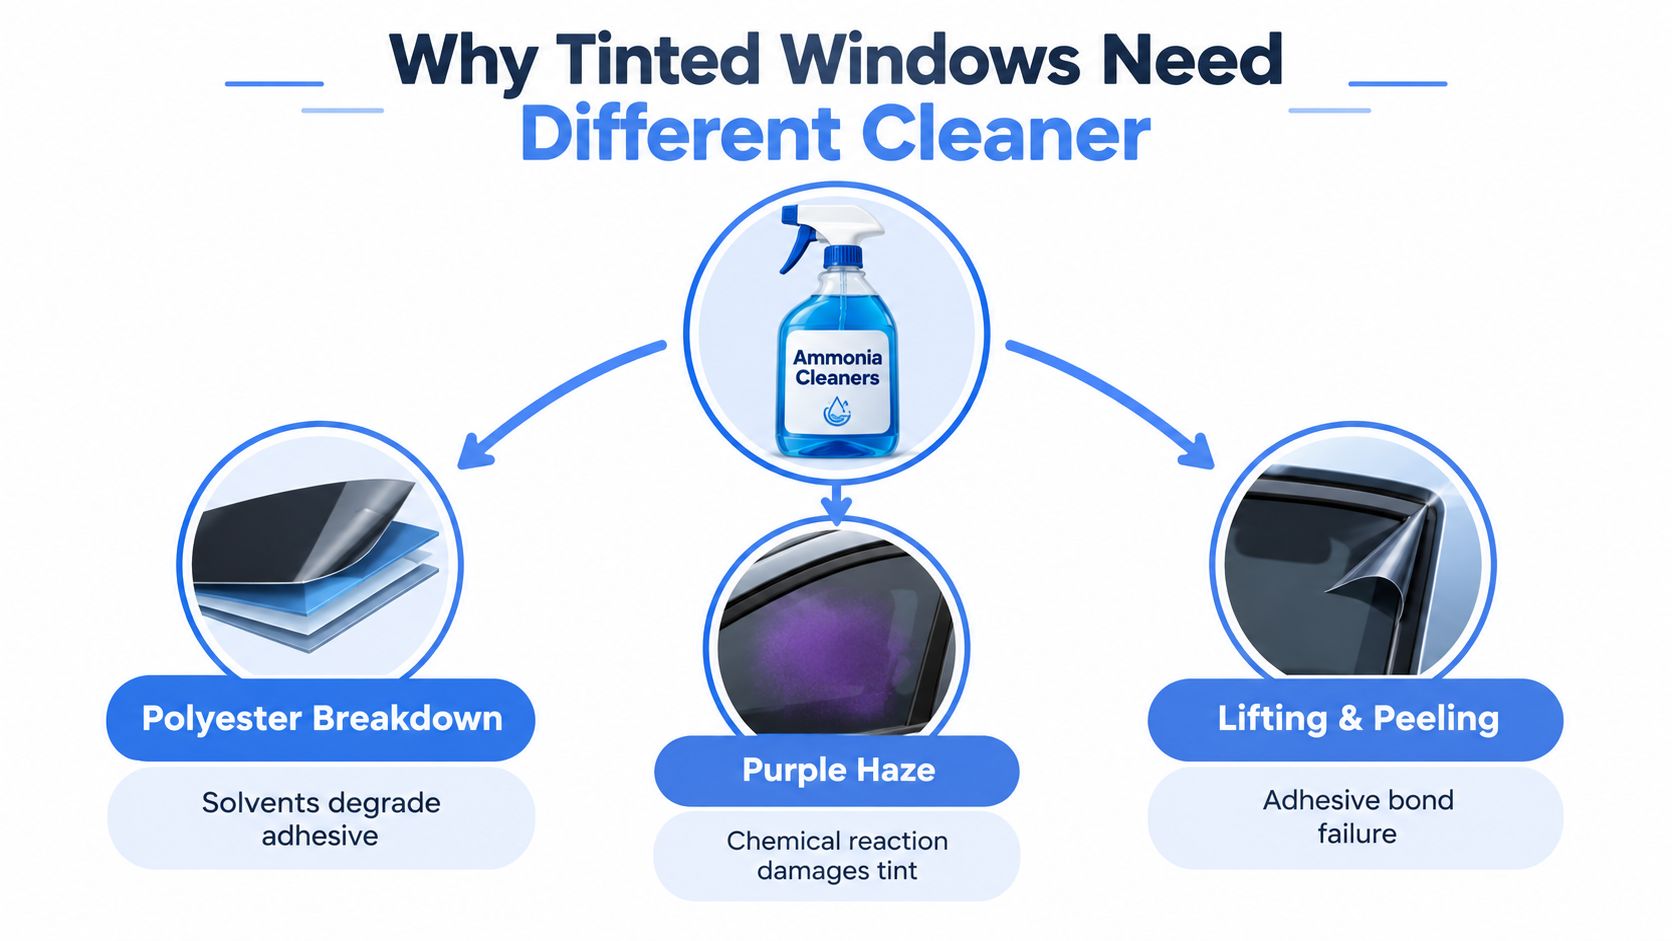
Tinted glass has bonded layers that rely on stable adhesive and an undamaged film surface. The wrong chemistry or tool can contribute to dye fading, adhesive softening near the edges, and purple discoloration as UV-blocking components deteriorate.
Ammonia deserves caution because repeated exposure may discolor film, dry it out, and reduce its service life. One wipe may show no obvious change. Continued use can eventually make haze, peeling, or color shifts visible.
Practical rule: An approved cleaner will not protect tint if the cloth carries grit or the film has not finished curing.
Tinted-window care depends on three controls:
A clean cloth matters as much as a compatible bottle. Avoid spraying into the frame, letting solution dry on sun-heated glass, or using a towel that previously collected dust from sills. Those small shortcuts can turn safe chemistry into a film problem.
The bottle matters, but timing and application matter more. A cleaner approved for tinted glass can still cause trouble if it is used before the film cures, applied in direct sun, or spread with a cloth carrying grit. Start with a commercial ammonia-free glass cleaner labeled for tinted or coated glass. Some professional formulas contain vinegar, but the product label remains the deciding factor.
Manufacturer guidance gives you a safer baseline. 3M allows Windex Original Glass Cleaner and a diluted isopropyl alcohol solution. LLumar recommends liquid glass cleaners or a mixture of 1/2 part distilled water, 1/2 part isopropyl alcohol, and 3 drops of dish detergent, while warning against razors, scrapers, and abrasive compounds. Follow the instructions for the film installed, because no household formula suits every film type.
For fingerprints and light dust, mist the cleaner onto a clean microfiber cloth, not directly onto the glass. Spraying the surface can send liquid toward film edges, frames, dashboards, screens, speakers, and door trim. Direct sun also heats the glass and shortens the working time, so clean in shade whenever possible.
A 2:1 mixture of water to isopropyl alcohol can handle isolated marks and oily residue when the film manufacturer permits it. Apply it sparingly and wipe it off before it dries, consistent with the diluted alcohol approach described in 3M's care guidance. For a broader explanation of safer formulations, see this guide to non-ammonia glass cleaner.
For heavier soil, use distilled water with a small amount of pH-neutral dish detergent. Extra soap creates more residue, not more cleaning power. Distilled water also helps where mineral spotting is a concern, since tap water can leave dissolved minerals behind as it dries, especially on warm exterior glass.
Never combine cleaners in one bottle. Empty, rinse, and dry the bottle before changing formulas.
| Cleaner Type | Safe For Tint? | Best Use Case | Avoid If |
|---|---|---|---|
| Ammonia-free liquid glass cleaner | Generally suitable when labeled for film | Routine fingerprints, dust, and light soil | The label includes ammonia or abrasive additives |
| 2:1 water-to-isopropyl alcohol mix | Suitable for controlled spot cleaning when compatible with the film | Small marks and oily residue | The film maker gives different instructions or the mixture is used aggressively |
| Distilled water with pH-neutral dish detergent | Suitable for heavier soil when used sparingly | Exterior dirt and general maintenance | Excess soap is left to dry |
| Ammonia-based cleaner | Not suitable for routine film care | No recommended use on tinted film | Any dyed, metalized, ceramic, or privacy film |
| Powder, abrasive pad, razor, or scraper | Not suitable | None | Every tinted surface |
SunTek, 3M, and LLumar may publish care directions for their own film families, so check the installation paperwork when available. Film-specific guidance outranks a generic cleaning habit.
Tinted windows don't need a complicated ritual. They need a clean sequence performed in the right order. Start by inspecting the film, then remove loose contamination before introducing moisture.
Run a clean, dry microfiber over the surface with almost no pressure. This lifts dust and loose grit instead of allowing those particles to drag under a wet towel. Use a separate cloth for frames, tracks, sills, and rubber seals because those areas commonly hold abrasive debris.
Mist the cleaner onto the microfiber, not directly onto the glass. This is especially important inside vehicles, where overspray can reach dashboards, screens, speakers, and door trim. It also limits liquid at the film perimeter, where seepage can stress a vulnerable adhesive edge.
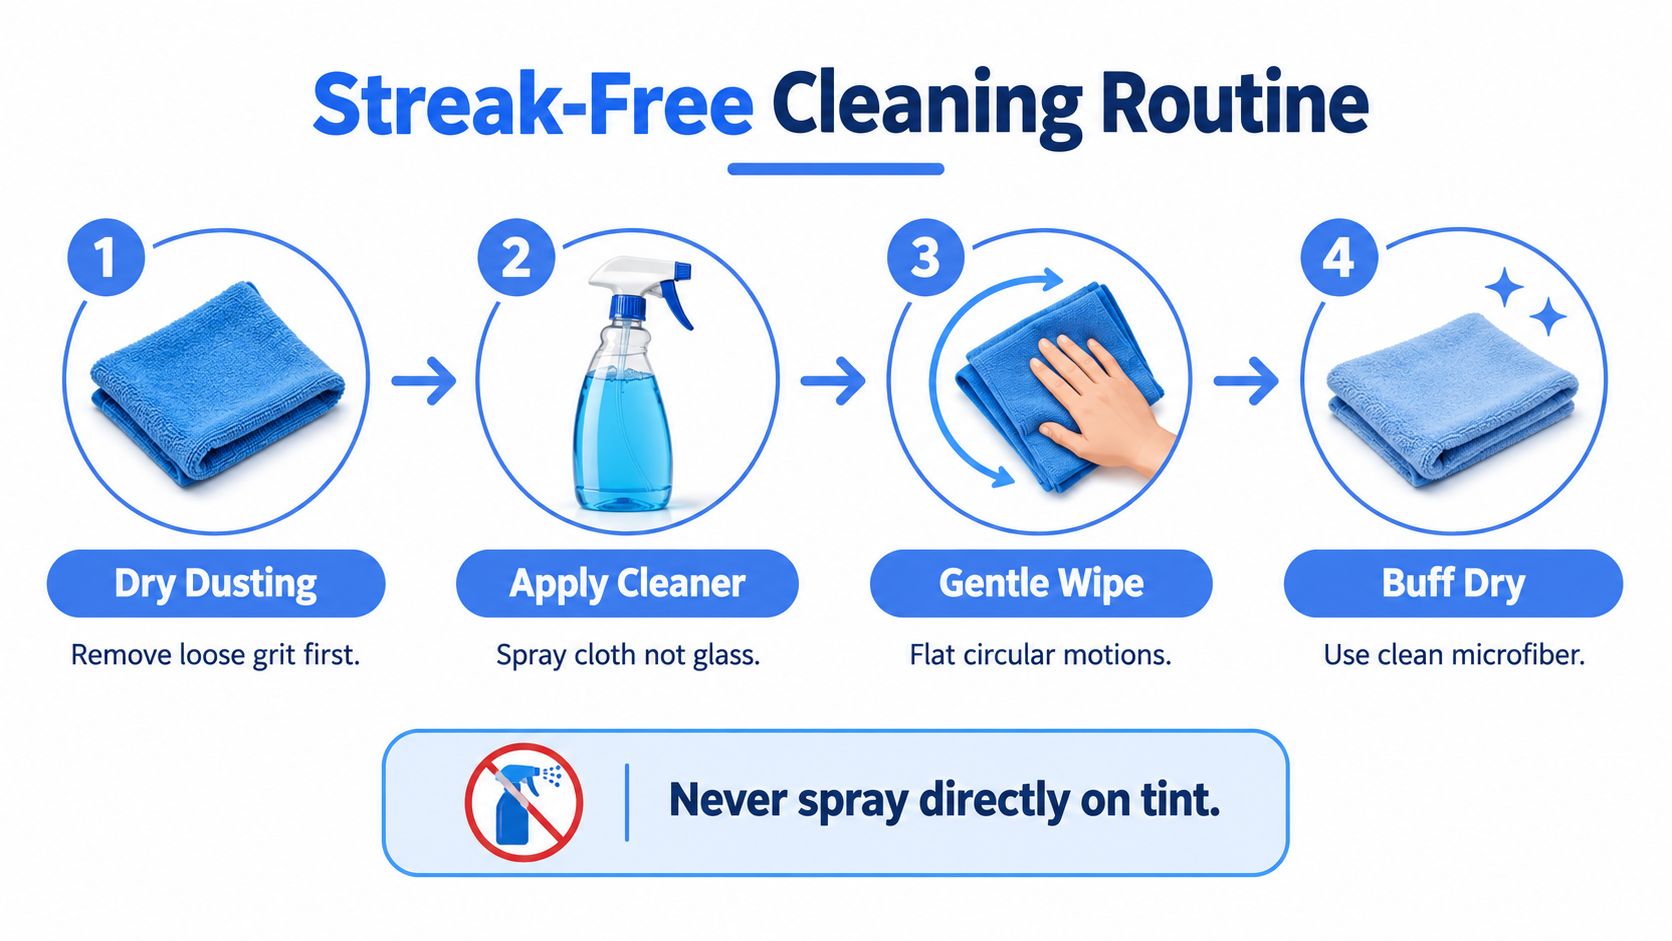
Wipe with straight horizontal or vertical passes and light pressure. Circular motion can redistribute residue and makes it harder to identify where streaks remain. Turn to a clean section of the cloth as soon as the working side becomes dirty.
Use a second, dry microfiber to buff the surface immediately. Don't wait for the cleaner to evaporate on its own, particularly on warm glass. Clean in shade or indoors whenever possible because direct sun causes rapid drying, uneven residue, and the streaks you're trying to remove.
Automotive interiors need extra restraint around tight edges and dashboard trim. Architectural exteriors involve larger panels, more runoff, and sometimes ladder or pole access, so the operator must control the amount of solution and avoid letting dirty water collect at the frame.
Before wiping, check for:
This short demonstration shows the motion and sequencing involved in controlled glass cleaning:
There are only two methods professional window cleaners use for larger window-cleaning work: the squeegee method and the pure-water system. Both can be safe on tinted glass when the operator understands the film, controls the tools, and keeps abrasive contamination away from the surface.
A traditional squeegee system uses a wetting tool, cleaning solution, and soft rubber blade. It gives excellent control on interior commercial tint and manageable flat panels. The rubber must be clean and in good condition. A damaged or dirty blade can drag grit along the film, especially on sensitive ceramic or security films.
A pure-water system filters ordinary tap water through reverse osmosis and deionization. The process removes minerals and impurities so the water can dry without leaving the residue associated with ordinary tap water, as explained by Unger's pure-water system information. It's particularly useful on exterior glass, high-access façades, and panels where minimizing hand contact improves control.
| Factor | Squeegee Method | Pure-Water Method |
|---|---|---|
| Main equipment | Applicator, bucket, and soft rubber blade | Filtration system, brush, and water-fed pole |
| Best fit | Interior commercial tint and accessible panels | Exterior glass and high-access work |
| Main advantage | Precise water removal and close inspection | Low mineral residue and reduced direct contact |
| Main risk | Dirty blade, excessive pressure, or trapped grit | Poorly maintained water system or uncontrolled runoff |
| Access | Works from the floor, ladder, or interior side | Often reduces ladder use on suitable exterior work |
| Finish control | Operator removes solution directly | Operator relies on purified rinse and proper drying |
A professional should select the method based on film type, location, access, contamination, and warranty requirements, not on habit. A squeegee can be entirely appropriate for an accessible interior panel. Pure water can make more sense for an exterior curtain wall where repeated contact and mineral residue create avoidable risks. Pure-water window cleaning explains the system in greater detail.
The first cleaning is where many tint jobs go wrong. One industry guideline recommends waiting 30 days after installation before cleaning window film, while 3M automotive guidance says initial adhesion takes at least 48 hours and final adhesion can take up to 30 days, depending on environmental conditions. These recommendations appear in window-film cleaning guidance and should be weighed against the exact instructions from the installer and film manufacturer.
During curing, water in the adhesive gradually dissipates and the bond strengthens. Early cleaning can disturb the film edge or adhesive layer, particularly when the operator applies pressure, pushes water toward the perimeter, or catches an edge with a cloth.

Keep vehicle windows rolled up during the installer's specified waiting period. Leave any perimeter tape or protective material in place until the installer says it can be removed. If a fingerprint absolutely must be addressed, put a small amount of ammonia-free cleaner on a soft microfiber and touch only the affected area, using almost no pressure.
Temporary haze, small water beads beneath the film, and slight rippling can occur while fresh tint cures. Those signs differ from a corner that keeps lifting, a bubble containing visible debris, or a haze that remains unchanged after the film should have settled.
People planning a privacy-film project can also review this practical guide on how to install window privacy film like a pro, particularly for the importance of clean preparation and careful edge handling. Patience during the curing window protects the installation more effectively than switching between cleaning products.
A customer once called after a move-in clean because a newly tinted window had developed bubbles along the lower edge. The cleaner wasn't necessarily the only problem. The more useful questions were whether the film had cured, whether the cloth was contaminated with grit from the sill, and whether the crew had pushed liquid into the frame.
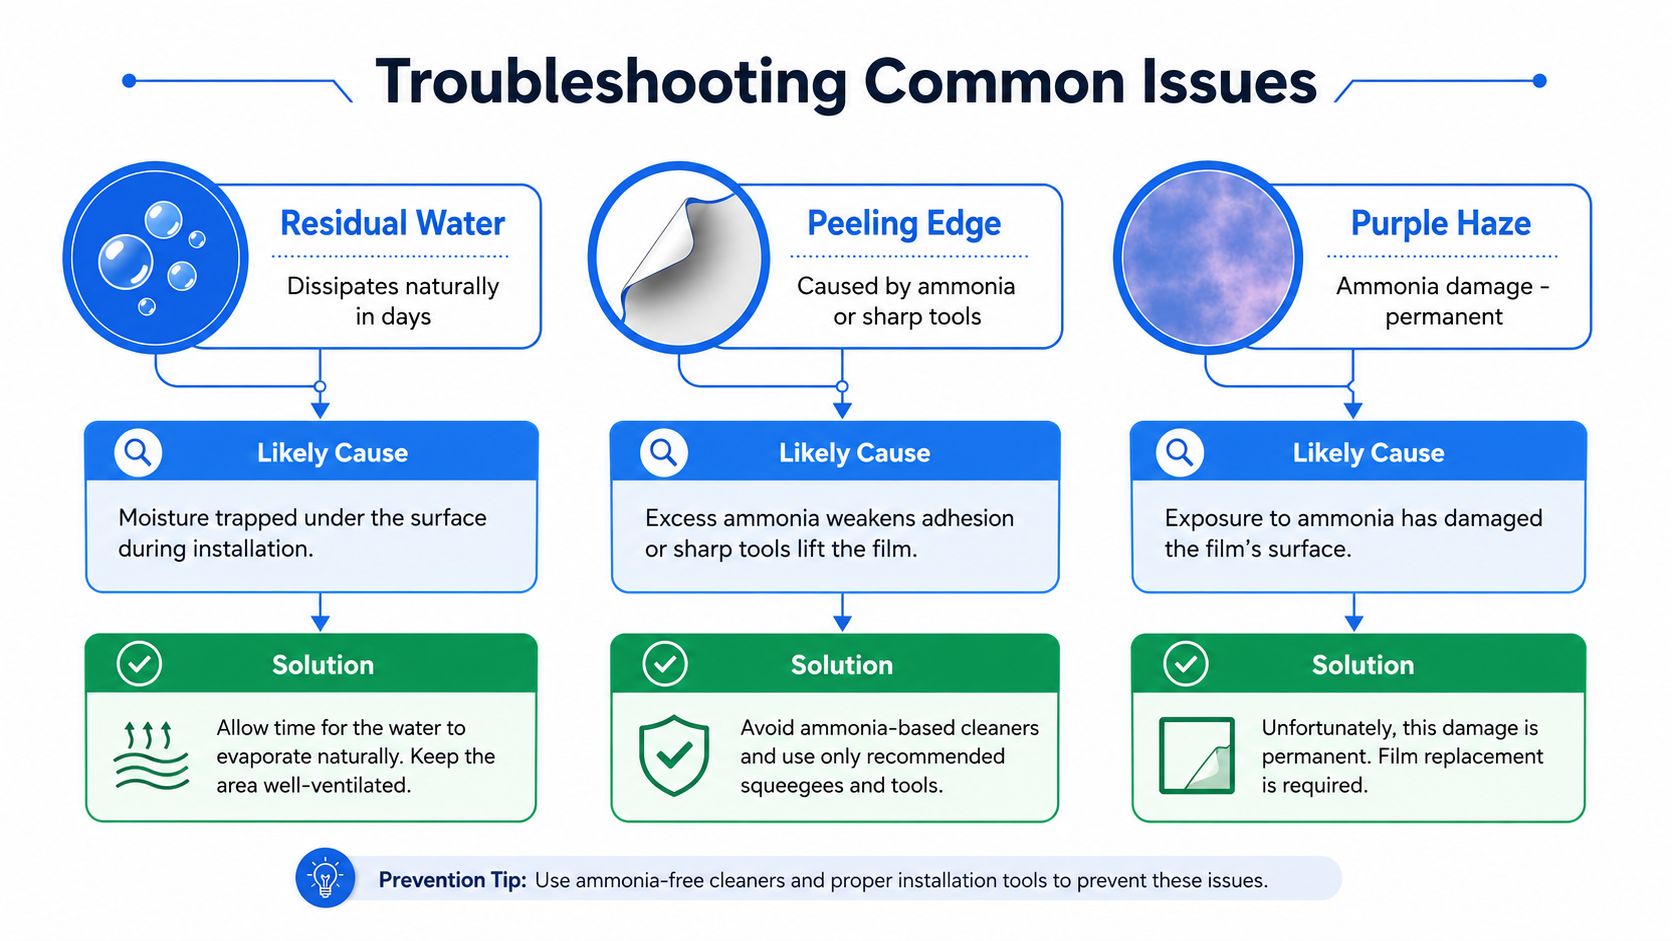
Small water beads under recently installed film may dissipate as the adhesive cures. Trapped debris looks different. It remains fixed in one place and may create a visible point or irregularity that won't flatten with time. A delamination bubble, where the adhesive bond has failed, usually signals a repair or replacement issue rather than a cleaning issue.
Peeling edges often trace back to ammonia exposure, sealant failure, or mechanical damage from a razor, scraper, brush, or abrasive pad. Don't push the loose edge down and hope it stays. Photograph the area, note what products and tools were used, and contact the original installer if the film is under warranty.
Haze has several possible causes. Curing haze may clear as moisture leaves the adhesive. Chemical haze can result from an incompatible cleaner and may be permanent. Installation quality or film failure can also produce persistent cloudiness.
A cautious field check is to warm the area briefly with a hair dryer on low. If the haze clears temporarily, residue or moisture may be involved and the film may still be intact. If the appearance doesn't change, the film itself may be compromised. Keep the dryer moving and don't heat the glass aggressively.
Don't turn a diagnosis into a repair attempt. Lifting film to inspect it can create damage that wasn't there at the start.
A useful maintenance plan is simple. Automotive tint benefits from light, gentle attention when fingerprints and interior film appear, with a more thorough clean when ordinary wiping no longer restores clarity. Architectural tint usually needs less frequent cleaning, unless it's exposed to kitchen grease, sprinkler minerals, construction dust, or coastal salt.
Inspect the edges every time you clean. That small habit catches lifting, trapped debris, and early discoloration before someone applies more pressure or stronger chemistry.
DIY care is reasonable when the window is accessible, the film has cured, the contamination is ordinary dust or fingerprints, and the warranty instructions allow owner cleaning. Use a dedicated microfiber, a compatible ammonia-free product, distilled water when mineral residue is a concern, and a soft rubber squeegee when appropriate.
Call a professional when the job involves:
Professional Window Cleaning uses controlled squeegee and pure-water methods for tinted windows, with soft tools and film-conscious cleaning practices. For recurring streaks, hard-to-reach panels, or warranty-sensitive work, a technician can assess the film and recommend a service plan based on the glass, access, and surrounding environment.
Professional Window Cleaning offers residential, commercial, high-rise, and architectural glass cleaning using controlled squeegee and pure-water methods suited to tinted surfaces. If you're dealing with difficult access, mineral buildup, recurring streaks, or a film that needs careful handling, visit Professional Window Cleaning to arrange an assessment.
Read our blog posts regularly and keep learning.